When a recipe tells you to “fold” in an ingredient, it’s asking you to do something very specific and gentle. It’s the technique of carefully combining a light, airy mixture (like whipped cream or egg whites) with a much heavier one (like a cake batter or melted chocolate).
The whole point is to mix them together without knocking out all the air you just worked so hard to whip in. Think of it less like mixing and more like gently tucking one ingredient into the other. This careful motion is the key to creating incredibly light and tender textures in your baking.
Understanding the Basics of Folding
You’ll find the term "fold" in recipes for everything from cloud-like chiffon cakes and airy soufflés to delicate mousses. It’s a foundational skill for any baker. Unlike stirring or beating, which can be quick and vigorous, folding requires a bit of patience and a gentle touch.
The goal is to protect the thousands of tiny, fragile air bubbles trapped in your whipped cream or egg whites. These bubbles act as a natural leavener, expanding in the oven to give your cakes lift and your mousses a melt-in-your-mouth quality. If you stir or mix too aggressively, those bubbles pop, and you'll end up with a dense, flat, or even rubbery result.
Folding vs. Stirring at a Glance
So, what really sets folding apart from stirring? While both are methods for combining ingredients, their purpose and movements couldn't be more different. Stirring is all about speed and creating a uniform mixture. Folding is about preservation.
Let's break it down in a simple table.
Action
Folding
Stirring / Mixing
Goal
Preserve air and volume.
Combine ingredients quickly and thoroughly.
Tool
Wide, flexible spatula.
Whisk, spoon, or electric mixer.
Motion
Gentle "cut, lift, and turn" motion.
Vigorous, circular, or back-and-forth motion.
Speed
Slow and deliberate.
Can be fast and energetic.
Outcome
Light, airy, and tender texture.
Smooth, uniform, and often dense texture.
This table makes it clear: they are two distinct techniques for two very different jobs in the kitchen.
To “fold” means to gently combine a lighter, aerated mixture into a heavier batter using a specific lift-and-turn motion so you retain as much trapped air as possible. The technique is explicitly distinguished from stirring or beating because overworking will deflate the air that provides volume and tenderness.
Imagine you're making a chocolate mousse. You've whipped your egg whites into beautiful, stiff peaks full of air. If you just dumped them into the heavy chocolate base and started stirring, you'd immediately see them collapse. All that lovely air would vanish, and your mousse would be dense and sad.
By gently folding, you integrate the two mixtures while keeping that precious aeration intact, resulting in the light, bubbly texture a great mousse should have. Knowing when a recipe needs this gentle touch is half the battle. Learning how to read a recipe effectively will help you spot instructions like "gently fold" and understand that it’s a non-negotiable step for success.
The Science of Folding: Why Air Is Your Key Ingredient
Have you ever seen the word "fold" in a recipe and wondered what that was all about? It’s not just a fussy, optional step—it's the secret to achieving those impossibly light and airy textures in desserts. The magic is all about protecting tiny, fragile pockets of air.
When you whip egg whites into stiff peaks or turn heavy cream into a cloud-like whip, you're literally forcing air into a liquid. This creates a delicate foam, which is basically a massive network of protein or fat molecules trapping countless air bubbles. Those bubbles are the ingredient that gives your bakes incredible volume and lift.
Preserving Your Natural Leavener
Think of all those air bubbles as your primary leavening agent, just like baking soda or yeast. Once that batter hits the oven, the heat causes the trapped air to expand, pushing the batter upward. This is what gives a chiffon cake its remarkable height and a soufflé its dramatic puff.
If you get aggressive and stir that batter like you’re making brownie mix, you’ll destroy that delicate structure. A frantic mixing motion doesn't just combine ingredients; it tears apart and pops the very air bubbles you worked so hard to create.
Imagine a bathtub full of thick, fluffy foam. If you gently sweep your hand through it, the foam mostly stays intact. But if you start thrashing and stirring, those bubbles disappear in seconds, leaving you with just soapy water. Your batter works the same way.
The entire point of folding is to keep that foam from collapsing. By gently scraping the heavier batter from the bottom of the bowl and layering it over the top of your light, airy mixture, you combine them with minimal damage. It’s a slow, deliberate dance designed to preserve as much of that precious air as possible. It’s a completely different goal from other techniques, like the one we cover in our guide on what the creaming method is in baking, where you're beating ingredients together to create air in a much more vigorous way.
The Physics in Your Bowl
When you fold, you're slowly introducing a dense, heavy mixture (like a flour or chocolate base) into a light one. This gradual process allows the two to marry without the heavy stuff immediately sinking to the bottom and squashing all the air out.
Here’s a closer look at what’s happening:
- You maintain the protein structure: Whipping unravels the proteins in egg whites, which then link up to form a net that holds air. Folding keeps this delicate net from ripping.
- You prevent deflation: The gentle "lift and turn" motion minimizes the force and friction that would otherwise pop your precious air bubbles.
Once you understand the science, folding stops feeling like a chore and starts feeling like a purposeful craft. You're not just mixing; you’re carefully protecting the very architecture of your dessert.
Your Step-by-Step Guide to the Perfect Fold
Alright, you understand why we fold. Now for the fun part: mastering the how. Getting the feel for folding is like learning a dance—it's all about rhythm and a light touch. Once you nail down the motion, you'll be able to create those incredibly light, airy textures every single time.
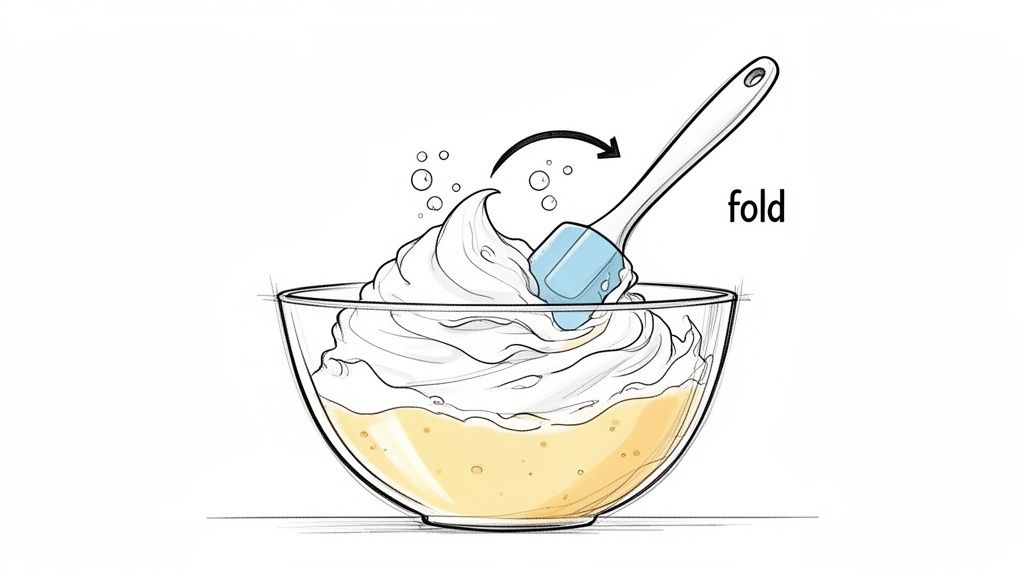
This simple visualization breaks it down perfectly. First, you whip in the air. Then, you fold to keep it there.

As you can see, whipping is what creates the bubbles, but folding is what protects them.
Step 1: Lighten the Base
Imagine you have a dense, heavy cake batter and a cloud-like bowl of whipped egg whites. If you just plop the whites on top, they’ll sink and deflate under their own weight. We need to bridge that gap in texture first.
The trick is to sacrifice a little bit of your airy ingredient to start. Scoop about one-quarter of your whipped cream or egg whites into the heavier batter and just stir it in. Don't worry about being gentle here—the only goal of this first addition is to lighten up the dense base, making it far more welcoming for the rest of the foam.
Step 2: Add the Rest of the Airy Mixture
With your base lightened, you can now add the rest of your airy mixture. Gently pile it on top. Let it sit there in a big, fluffy mound; this is the ideal setup for an effective fold.
Step 3: The Classic Cut, Scrape, and Lift
This is the heart of the technique. Grab your spatula and think of it as an extension of your hand. You're going to make one smooth, continuous motion.
- Cut: Slice your spatula straight down through the very center of the mixture, all the way to the bottom of the bowl.
- Scrape: As you reach the bottom, turn your wrist and scrape the spatula along the curve of the bowl, scooping up some of the heavier batter from below.
- Lift & Fold: Continue the motion upwards, bringing that scoop of batter up and gently folding it over the top of the fluffy mixture.
It’s a graceful, deliberate movement, not a frantic stir. Each fold is designed to combine the ingredients while losing as little air as possible.
People often describe the motion as drawing a "J" in the bowl. You cut straight down for the line of the "J," then scrape along the bottom for the curve. This simple visual can really help lock in the technique.
Step 4: Rotate and Repeat
After you complete one fold, give the bowl a quarter turn (about 90 degrees). Then, do it again: cut, scrape, lift, and fold.
Keep this rhythm going—fold, rotate, fold, rotate. You’ll see the two mixtures start to come together slowly and gently.
Step 5: Know When to Stop (This Is Crucial!)
This is where so many bakers go wrong. The goal is not a perfectly uniform, homogenous batter. If you can’t see any trace of your whipped whites or cream, you’ve gone too far. That’s called overmixing, and it means you’ve knocked out all the air you worked so hard to incorporate.
Stop folding when you can still see a few faint streaks of the lighter ingredient. That’s the sweet spot. You've preserved the maximum amount of air, and the batter will finish combining naturally as you pour or scoop it into the pan.
And remember, delicate techniques like this are only half the battle. Getting the ingredient amounts right is just as vital. Using accurate cups to grams conversions ensures your batter has the right structure to support all that air you just folded in.
When to Use the Folding Technique in Your Baking
Knowing how to fold is a great start, but knowing when to use this gentle touch is what really elevates your baking. Folding isn't just a fancy, optional step; it's the only way to go for recipes that get their structure and lightness from trapped air.
Think of it as your secret weapon for protecting all the air you've painstakingly whipped into your ingredients. You'll need it any time you're combining a delicate, airy mixture with a heavier, denser base. The mission is always the same: mix them together without losing that precious volume.
For Meringue and Whipped Egg Whites
This is the classic, most critical time to fold. Whipped egg whites are the soul of so many famously light desserts, giving them a lift that baking powder or soda just can't replicate.
- Angel Food and Chiffon Cakes: These cakes are all about that cloud-like texture. You achieve it by gently folding flour and other dry ingredients into a massive cloud of whipped egg whites. If you stirred, that beautiful meringue would instantly collapse, leaving you with a dense, rubbery cake.
- Macarons: That perfect macaron texture—crisp on the outside, chewy on the inside—comes from carefully folding almond flour and powdered sugar into a meringue. Overdo it, and you get flat, oily discs. Underdo it, and they'll be lumpy and cracked.
- Soufflés: A soufflé gets its dramatic rise from one thing: the steam that expands the air bubbles you preserved in the egg whites. Aggressive mixing guarantees a sad, flat soufflé every single time.
Folding became a non-negotiable technique as these kinds of delicate recipes became more popular. Throughout the 18th and 19th centuries, as cake-making became more refined, instructions to "fold in" beaten egg whites started appearing everywhere. By the 20th century, it was cemented as a fundamental skill for any serious baker.
For Whipped Cream Creations
Just like egg whites, whipped cream is mostly air. It's what gives desserts that incredible melt-in-your-mouth feel, and you have to protect those tiny air bubbles at all costs. Folding is essential for everything from airy mousses to fluffy pancakes.
Folding is the only way to combine ingredients like melted chocolate or fruit purée into whipped cream without turning it back into a liquid. The gentle motion keeps the fat-stabilized air bubbles intact.
You'll see this in action in recipes like:
- Mousses: Whether you're making a chocolate, fruit, or coffee mousse, its signature airy texture comes from folding the flavoring base into either whipped cream, egg whites, or sometimes both.
- No-Bake Cheesecakes: Many no-bake cheesecake recipes get their light, velvety consistency from whipped cream that’s gently folded into a cream cheese mixture.
This technique becomes even more critical when you're baking in different environments. For example, knowing how to adjust recipes for high altitude is a game-changer, since leavening and aeration work differently up there, making a proper folding technique absolutely vital.
Choosing the Right Tools for Effective Folding
Having the right gear can make all the difference between a tricky technique and a simple, graceful motion. This is especially true when it comes to folding. While practice is key, the right tools really do make it easier to keep all that precious air you worked so hard to create.
A few smart choices will set you up for light, fluffy results every time.
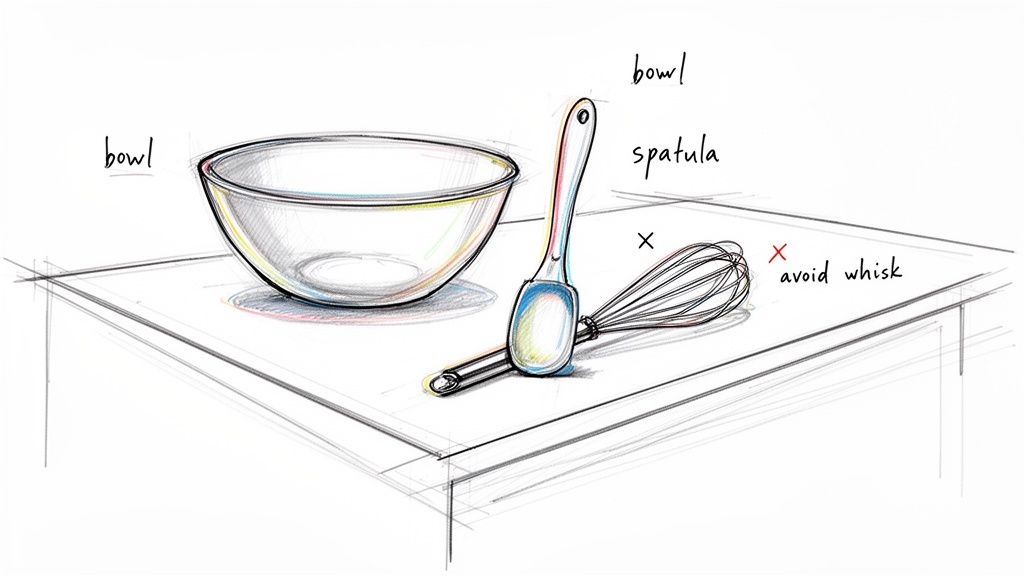
Your best friend for this job is a large, flexible silicone spatula. Its wide head moves a good amount of batter with each scoop, meaning you have to fold fewer times. The flexible edges are also perfect for scraping the sides and bottom of the bowl, making sure no heavy pockets of batter get left behind.
The Right Bowl Makes a Difference
Just as important as your spatula is the bowl itself. You absolutely need a wide, spacious mixing bowl to fold properly. It gives you the room you need to make that big, sweeping "cut, scrape, and lift" motion without feeling cramped.
A cramped bowl forces you into a smaller, more vertical stirring motion, which is the fastest way to knock the air out of your batter. Give your ingredients plenty of space to move.
If your bowl is too small or has straight, vertical sides, you'll find it almost impossible to get the technique right. That open space is crucial for maneuvering the spatula and gently combining your mixtures.
What Not to Use
Some tools are just not cut out for this job and will actually work against you. Steer clear of these.
- Spoons: They're just too small. You'll have to make way too many motions, and their rigid edges can't scrape the bowl clean. This is a recipe for overmixing and a streaky, uneven batter.
- Whisks: A whisk is designed to beat air in or break up clumps. If you try to fold with one, its thin wires will slice right through all those delicate air bubbles, completely undoing your hard work.
While folding itself is a manual technique, remember that the ingredients are often prepped with powerful equipment. Understanding the full range of kitchen hardware, from a simple spatula to commercial planetary mixers, helps you appreciate how the pros get those perfect results. For more recommendations, check out our guide to the best baking tools.
Common Folding Mistakes and How to Avoid Them
Even seasoned bakers had to learn this technique, and trust me, there's always a bit of trial and error. To really understand what does fold mean in baking, you have to know what it isn't. Getting familiar with the common slip-ups is the fastest way to build your confidence.
The good news? Most of these mistakes are simple to spot and even simpler to correct once you know what to look for. Let’s break down the three most common errors I see so you can sidestep them completely.
Mistake 1 Overmixing the Batter
This is, without a doubt, the number one culprit. We all want that perfectly smooth, uniform batter, and it’s tempting to keep going until every last streak is gone. But if you fold for too long, you’ll end up with a flat, dense bake because you’ve squeezed out all those precious air bubbles.
- The Fix: Stop folding sooner than you think you should. It's okay—in fact, it's ideal—to still see a few faint streaks of egg white or whipped cream. The batter will continue to mix a little more as you transfer it to the pan. Have faith in the process and put the spatula down.
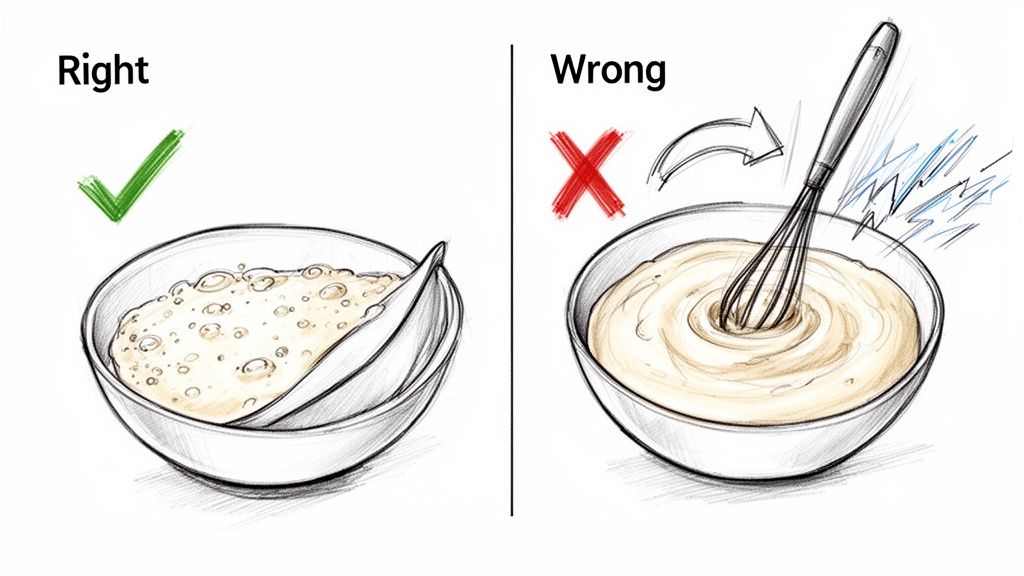
Mistake 2 Stirring Instead of Folding
It’s so easy to slip back into old habits. If you catch yourself making frantic, circular motions, you’re stirring, not folding. Stirring is aggressive and the sworn enemy of a light, airy batter. You're actively knocking the air out.
- The Fix: Slow everything down. Be deliberate with your movements. Hold the spatula firmly and think of it as a paddle, not a spoon. Focus on the "cut, scrape, lift" motion. I find it helps to rotate the bowl about a quarter turn after each fold—it creates a gentle, steady rhythm.
Remember, the goal of folding is preservation, not aggressive combination. Each motion should be slow and graceful, designed to protect the delicate air pockets you worked so hard to create. If your arm is tired, you’re likely stirring, not folding.
Mistake 3 Undermixing and Leaving Pockets
On the flip side, you have undermixing. While a few streaks are good, big, unmixed pockets of flour at the bottom of the bowl or clumps of egg white are not. This will give you a weird, inconsistent texture with dense, gummy spots in your final bake.
- The Fix: Your spatula needs to make contact with the bowl. On every single fold, make sure you scrape right along the bottom and up the sides. A good, flexible silicone spatula is perfect for this, as it can bend to the curve of the bowl, ensuring no heavy batter gets left behind.
Still Have Questions About Folding? Let's Clear a Few Things Up.
Even after you get the hang of it, a few common questions tend to pop up. Let's tackle them so you can fold with confidence and get those light, airy results you're looking for.
Can I Just Use My Electric Mixer to Fold Everything In?
This is a big one, and the short answer is a hard no. Using a stand mixer or even a hand mixer is the fastest way to undo all your hard work. Their powerful, high-speed action is designed to beat and whip, which would instantly pop all those delicate air bubbles you so carefully created.
Folding has to be done by hand with a large spatula. It’s all about control and a gentle touch, which is something a machine just can't replicate. This is the only way to keep the volume you've built and get that signature light-as-air texture.
How Do I Know When I'm Done Folding?
This is probably the trickiest part of mastering the technique. You want to stop folding the moment the mixture is just combined. This means you shouldn't see any big, distinct patches or streaks of the lighter ingredient (like the egg whites or whipped cream) anymore.
A few faint wisps or small, lingering streaks are actually a good sign! It's much better to stop a little early than to overmix. If your batter is perfectly uniform in color, with zero streaks, you've likely gone a bit too far and knocked out some precious air.
What's the Big Deal? Can't I Just Stir It All Together?
Stirring is the mortal enemy of a delicate batter. The vigorous, round-and-round motion of stirring will completely deflate your mixture. It aggressively breaks down the fragile air pockets in your egg whites or cream, causing the whole batter to become heavy and dense.
The result? Instead of a light, tender crumb, you'll end up with a bake that's tough, flat, and rubbery. For something like a soufflé or a chiffon cake, stirring is a guaranteed way to ruin it—the batter simply won't have the structure to rise in the oven.
Tired of losing your favorite recipes from across the internet? Let Recipe One capture and organize them for you with a single click. Keep your culinary inspiration in one clean, easy-to-use library at https://www.recipeone.app/.

