Getting your cooking measurements right is the secret to making any recipe work, whether you're switching between cups and grams or tablespoons and milliliters. This is especially true for baking, where being even a little bit off can completely change the texture and taste of what you’re making. Mastering these conversions is the key to consistent, delicious results.
Your Quick Reference for Kitchen Conversions
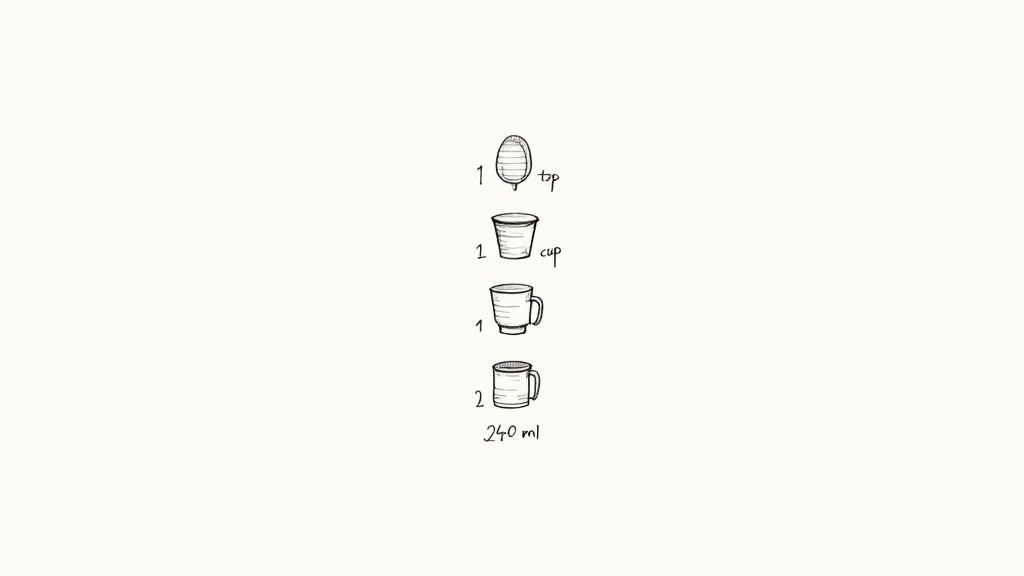
It doesn't matter if you're a seasoned pro or just starting out—a handy conversion guide is a must-have in any kitchen. One of the biggest reasons recipes fail is simply due to wonky measurements. This guide will give you the confidence to measure ingredients accurately every single time.
It's easy to get tripped up by the different measurement systems out there. The vast majority of the world, around 95% of countries, uses the metric system with grams and milliliters. The United States, on the other hand, sticks with customary units like cups and tablespoons. That difference alone is why a good conversion chart is so important for modern cooks.
Why Precision Matters
When you’re cooking a stew, tossing in an extra clove of garlic is no big deal. But baking is a different story; it's all about chemistry. The reactions that give you a light, fluffy cake or perfectly chewy cookies rely on a precise balance of ingredients.
- Consistency: When you measure correctly, you can recreate your favorite recipes perfectly, time and time again.
- Texture: Too much flour can lead to a dry, dense cake. Too little, and it might not rise at all.
- Flavor: The right balance of ingredients is what makes the final flavor profile work, from the perfect level of sweetness to just the right amount of salt.
For recipes that depend on exact ratios, like making pancakes, getting the measurements right is the key to success. For a great example, check out Your Guide to Perfect Pancakes.
The fundamental difference between a good baker and a great one is consistency, and consistency is born from accuracy. Measuring by weight with a digital scale is the single most effective way to improve your baking results.
For quick help on the fly, don't forget to check out the free conversion tools on Recipe One at https://www.recipeone.app/tools. They make switching between grams, cups, and other units a total breeze. This guide will arm you with the essential charts and knowledge you need to follow any recipe with confidence.
Understanding Volume vs. Weight Measurements
When you start a new recipe, the ingredient list is your blueprint. But here's something you need to know: not all measurements are the same. The single biggest step you can take toward getting consistent, bake-shop-quality results is understanding the difference between measuring by volume (with a cup) versus weight (with grams).
Volume is just a measure of how much space something takes up. It’s quick and easy, which is why it's so common, but it can be shockingly inaccurate for dry ingredients. The reason? An ingredient's density can shift all over the place depending on how you scoop it.
Why a Cup Is Not Always a Cup
Let's talk about the classic example: all-purpose flour. Imagine one person scoops flour right out of the bag, packing it down into the measuring cup. Someone else might gently spoon the flour into the cup before leveling it off. That packed cup can easily hold 20-30% more flour by weight than the spooned one—a difference big enough to turn what should have been a tender cake into a tough, dry brick.
- Packed Flour: This method squeezes the flour, forcing more of it into the same space.
- Sifted Flour: Sifting adds air, making the flour lighter and much less dense.
- Spooned Flour: This is a good middle-of-the-road technique, but it can still vary quite a bit.
This is exactly why professional bakers and chefs almost always measure by weight. A gram is always a gram. It doesn't matter if your flour is packed down, fluffed up, or settled.
The Power of a Kitchen Scale
A simple digital kitchen scale takes all the guesswork out of the equation. It guarantees that 120 grams of flour is the same amount every single time, giving you a recipe you can rely on. This kind of precision isn't just for baking, either—it's incredibly helpful for managing portion sizes and tracking nutrition. When you weigh your ingredients accurately, you have a much better handle on their caloric content. If you're curious about that, you can see how precise measurements play into dietary tracking with a recipe calorie calculator.
This image shows just how much a "cup" of flour can vary.
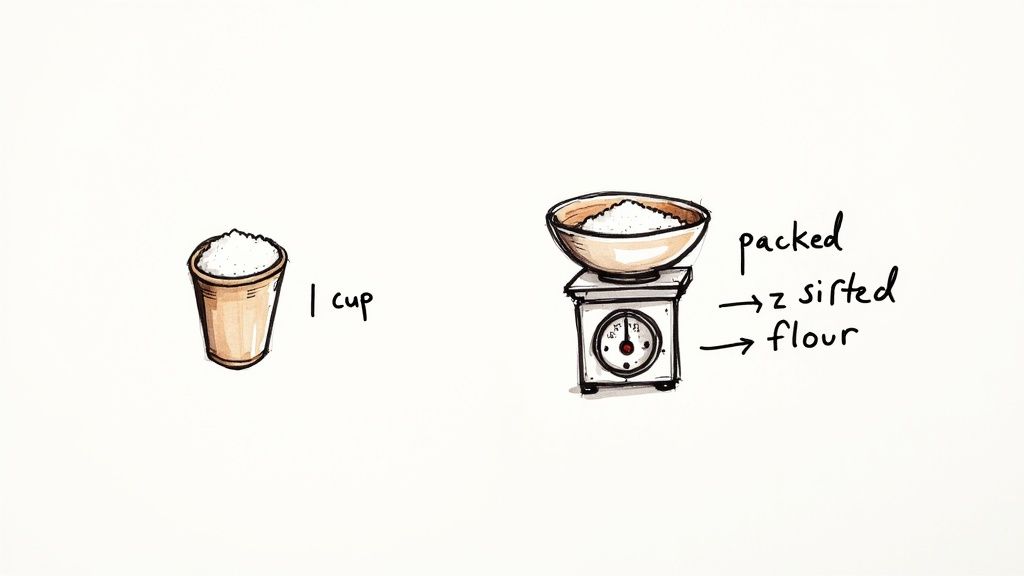
As you can see, the way you fill the cup drastically changes the final weight. It’s a perfect illustration of why volume measurements for dry ingredients can be so unreliable.
Pro Tip: Buying an inexpensive kitchen scale is the single best investment you can make for your baking. It removes the biggest reason recipes fail and lets you tackle any recipe with total confidence.
While using cups is perfectly fine for liquids like water or milk (where 8 fluid ounces is pretty much always 8 ounces in weight), making the switch to weight for dry ingredients is a total game-changer. It's the secret to that professional consistency you've been looking for and the first step to mastering your cooking conversions.
The Ultimate Ingredient Conversion Chart From Cups To Grams
Switching from measuring by volume (cups) to weight (grams) is the secret to getting professional-level results in your own kitchen. It's the single best thing you can do for consistency. Think about it: a cup measures space, but a gram measures mass. They aren't the same thing, and that's where recipes can go wrong.
The difference really hits home when you compare ingredients. A dense, sticky cup of honey weighs a hefty 340 grams. But a cup of light, fluffy all-purpose flour? That comes in at only 120 grams. That’s a massive gap! You can see why just swapping one for the other doesn't work. Using a kitchen scale takes all the guesswork out of measuring, so you can stop worrying about how packed your flour is or whether you’ve scooped enough. Your cookies will come out perfect every time.
Below you'll find a go-to reference chart to help you convert your favorite recipes from volume to weight with confidence.
Flours And Powders
Flour is probably the biggest offender when it comes to inaccurate cup measurements. Depending on whether you scoop it straight from the bag or spoon it lightly into a cup, the amount can vary by as much as 30%! For anyone who takes their baking seriously, weighing flour isn't just a good idea—it's essential.
Sugars And Sweeteners
Not all sugars are created equal. The size of the crystals and the amount of moisture they hold can throw off volume measurements. Brown sugar is especially tricky because it needs to be packed down, which is a very inconsistent way to measure. A quick tip for sticky stuff like honey: give your measuring cup a light spray of oil first, and it will slide right out.
- Granulated Sugar: 200 g
- Packed Brown Sugar (Light or Dark): 220 g
- Honey or Molasses: 340 g
- Maple Syrup: 322 g
- Corn Syrup: 326 g
You might notice that packed brown sugar weighs more per cup than granulated sugar. That's because the standard way to measure it by volume is to press it firmly into the cup. A scale gets rid of that variable completely.
Fats And Oils
Fats also have different densities. Butter is pretty straightforward since it’s usually sold in pre-measured sticks. But something like shortening can trap air pockets when you scoop it, leading to an inaccurate measurement.
Liquids
Most common liquids like water, milk, and broth are pretty close in weight. A standard U.S. cup is 8 fluid ounces, which for water works out to about 236 grams. This is one of the rare cases where volume is a decent stand-in for weight, but for true precision, it's still best to use a scale. When you need to be exact, like when cooking grains, having the right amounts is critical. For a deeper dive, check out our complete guide to the perfect rice to water ratio.
Nuts, Grains, And Add-Ins
This category is where volume measurements can really fall apart. The irregular shapes of nuts, oats, and chocolate chips create a lot of empty air space in a measuring cup. For example, a cup of whole almonds weighs less than a cup of chopped almonds, simply because the smaller pieces can pack together more tightly.
- Rolled Oats (Old-Fashioned): 85 g
- Quick-Cooking Oats: 99 g
- Chocolate Chips: 170 g
- Raisins: 149 g
- Chopped Walnuts or Pecans: 120 g
- Whole Almonds: 143 g
- Uncooked Rice (Long-Grain): 185 g
With these charts, you can confidently convert any recipe from cups to grams. It’s the key to making sure your food turns out exactly how it was meant to, every single time.
Navigating Liquid And Dry Measurement Systems
https://www.youtube.com/embed/eK8gXP3pImU
Ever find a great recipe online, only to realize it’s from another country with measurements you don’t recognize? It’s a common hurdle. A UK recipe might call for imperial pints, an American one uses customary cups, and a European one lists everything in neat milliliters. Getting a handle on these different systems is the secret to making any dish work in your own kitchen.
While many of these units have similar names, they often represent different amounts. Those small discrepancies can throw off a recipe in a big way. Knowing the basic conversions ensures your dishes turn out exactly as the author intended, no matter where they're from.
US Customary vs. Imperial Systems
One of the biggest mix-ups happens between the U.S. customary and British imperial systems. They seem almost identical, but there’s a crucial difference in how they measure liquid volume. The imperial fluid ounce is just a tiny bit smaller than its U.S. counterpart, which creates a noticeable gap as the amounts get larger.
- 1 U.S. Fluid Ounce (fl oz): Roughly 29.57 milliliters (mL)
- 1 Imperial Fluid Ounce (fl oz): Roughly 28.41 milliliters (mL)
This tiny difference really adds up. An imperial pint is made up of 20 imperial fluid ounces, but a U.S. pint only has 16 U.S. fluid ounces. That's a gap of almost 100 mL in a single pint—more than enough to mess up the texture of a cake batter or a delicate sauce.
Pro Tip: Always check where a recipe comes from. If it’s from the UK, Australia, or another Commonwealth country, you can bet it’s using imperial measurements. If it's American, it’ll be U.S. customary units.
Converting To The Metric System
Many cooks find the metric system, with its simple base-10 logic, to be the easiest for scaling recipes up or down. Converting U.S. or imperial units to milliliters (mL) and liters (L) is pretty straightforward once you know the basic factors. It takes the guesswork out of doubling a recipe or cutting it in half.
This chart really brings home the point about why volume can be deceiving, especially in baking.

As you can see, a cup of dense butter weighs a lot more than a cup of light, airy flour. This is exactly why a kitchen scale is a baker's best friend—it guarantees perfect accuracy every time.
Practical Liquid Volume Conversions
Here’s a quick-reference table I keep handy for the most common liquid conversions you’ll run into. It covers small measurements like teaspoons all the way up to a gallon. Getting these right is especially critical for things like cooking grains, where the water-to-grain ratio is everything. For a deeper dive on that, you might want to check out our guide on how to cook rice perfectly.
U.S. Customary Unit
Metric Equivalent (Approx.)
Imperial Equivalent (Approx.)
1 Teaspoon (tsp)
5 mL
1/6 fl oz
1 Tablespoon (Tbsp)
15 mL
1/2 fl oz
1 Cup (8 fl oz)
237 mL
8.3 fl oz
1 Pint (2 cups)
473 mL
16.7 fl oz
1 Quart (4 cups)
946 mL
33.3 fl oz
1 Gallon (16 cups)
3.8 L
133.2 fl oz
If you keep these key differences and conversions in mind, you can approach recipes from anywhere in the world with confidence, knowing you’ll get consistent, delicious results.
Converting Oven Temperatures For Any Recipe
Ever find a fantastic recipe from another country, only to get stuck on the oven temperature? It's a common hurdle. A British recipe might call for "Gas Mark 4," while an American one says 350°F and a European version lists 177°C. Knowing how to translate these numbers is the key to getting your dish just right, avoiding that dreaded undercooked middle or those burnt edges.
This isn't just a modern problem, either. Before we had standardized measurements in the early 20th century, recipes were a lot less precise. You’d see vague instructions like "bake in a moderate oven" or a "hot oven." For reference, a "quick oven" back then meant somewhere around 375-400°F. Cooks just had to know their equipment and develop a feel for it.
Common Oven Temperature Conversions
To make life easier, here’s a handy chart that covers the most common temperatures you'll encounter. It bridges the gap between Fahrenheit, Celsius, and the UK’s Gas Mark system, so you can tackle any recipe with confidence.
Description
Fahrenheit (°F)
Celsius (°C) (Conventional)
Celsius (°C) (Fan/Convection)
Gas Mark
Cool
225°F
110°C
90°C
1/4
Very Slow
250-275°F
120-140°C
100-120°C
1/2 - 1
Slow
300-325°F
150-160°C
130-140°C
2 - 3
Moderate
350-375°F
180-190°C
160-170°C
4 - 5
Hot
400-425°F
200-220°C
180-200°C
6 - 7
Very Hot
450-475°F
230-240°C
210-220°C
8 - 9
Adjusting For Different Oven Types
The type of oven you have matters, too. Convection ovens, for example, cook differently than conventional ones and require a quick adjustment. If you’re working with specialized equipment, it's worth understanding commercial convection ovens to see how they operate and why temperature changes are so critical.
The go-to rule for a convection (or fan) oven is pretty simple: just reduce the recipe's temperature by 25°F (about 15°C). The fan circulates hot air, cooking food faster and more evenly, so this little tweak prevents your food from drying out or over-baking.
Of course, temperature is also a massive factor when you're frying. The heat of your oil can make or break a dish. For more on that, take a look at our guide and cooking oil smoke point chart. Once you get the hang of these temperature conversions, you'll be able to adapt any recipe to your own kitchen.
Essential Techniques For Accurate Measuring
More than just numbers on a chart, how you measure your ingredients can completely change the outcome of a recipe. Believe it or not, the way you fill a measuring cup with flour can alter the final amount by as much as 25-30%. Learning a few simple techniques is the real secret to getting consistent results every time you cook.
Once you get these habits down, you'll see a huge improvement in your baking and cooking. It's all about taking the guesswork out of the equation.
Measuring Dry Ingredients The Right Way
The biggest mistake I see people make with dry ingredients—flour, cocoa powder, sugar—is scooping directly out of the bag or canister. This packs the ingredient down, giving you way more than the recipe calls for, which often leads to dense, dry baked goods.
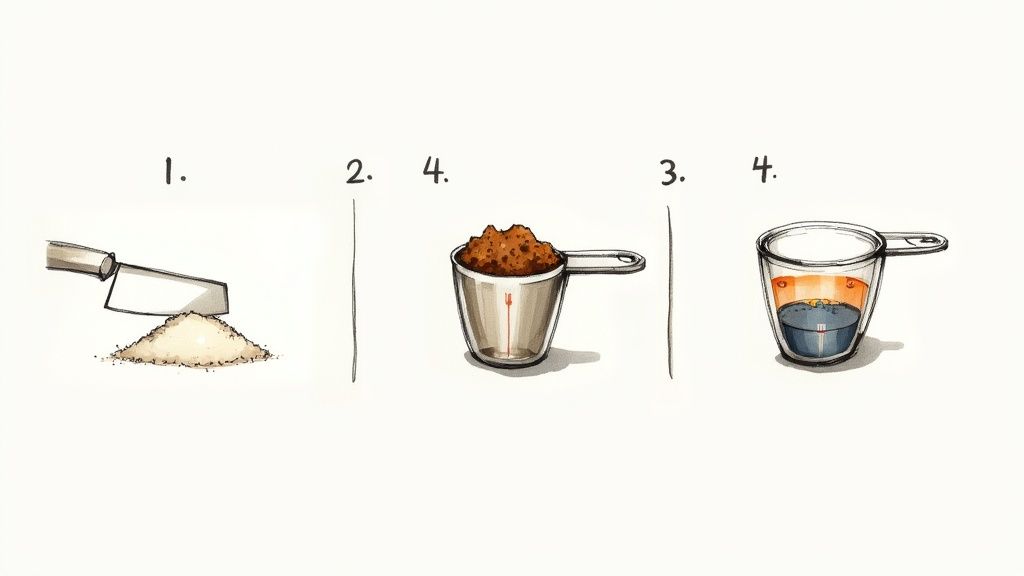
Instead, the gold standard is the “fluff, spoon, and level” method. It's easy:
- Fluff It Up: First, use a fork or a spoon to stir the ingredient in its container. This aerates it and breaks up any clumps.
- Spoon into the Cup: Lightly spoon the ingredient into your measuring cup until it’s overflowing a bit. Don't pack it down!
- Level It Off: Take the back of a butter knife and sweep it across the top of the cup, pushing the excess off. You'll be left with a perfectly flat, accurate measurement.
This simple process guarantees you get a light, consistent measure every single time.
Exception to the Rule: The one time you do want to pack it in is with brown sugar. Press it firmly into the cup with a spoon to get rid of any air pockets. When you dump it out, it should hold the shape of the cup perfectly.
Achieving Precision With Liquids
For liquids like milk, water, or oil, the rules are different. Trying to measure them in a dry cup is a bad idea—you can never fill it to the absolute top without spilling, so you’ll always come up short.
Always grab a clear liquid measuring cup with a spout. Place it on a flat countertop, then bend down so your eyes are level with the measurement line you're aiming for. If you look down from above, the curve of the liquid (the meniscus) will trick you into thinking you have more than you actually do.
Handling Sticky And Awkward Ingredients
Ingredients like honey, molasses, or peanut butter are notorious for sticking to everything, making them a pain to measure accurately.
Here’s a great little trick: give your measuring cup or spoon a light coating of cooking spray or a neutral oil first. This creates a non-stick surface, so the sticky stuff slides right out without leaving any behind. It’s a tiny step that makes a big difference in getting your measurements just right.
Kitchen Conversion FAQs
Even with all the charts and calculators in the world, some questions about kitchen conversions just keep coming up. These are the little details that can trip up even experienced cooks, often making the difference between a good recipe and a truly great one. Here are some straightforward answers to those common sticking points.
Think of this as your go-to spot for those "wait, what about...?" moments. Getting these details right will help you cook with more confidence, no matter what recipe you're tackling.
Is a Fluid Ounce the Same as a Weight Ounce?
This is probably the single most common point of confusion, and the answer is a hard no. They measure two totally different things, and mixing them up is a classic kitchen mistake. A fluid ounce (fl oz) is a measure of volume—it’s all about how much space something takes up. A weight ounce (oz) is a measure of mass, or how heavy something is.
So why the confusion? It usually comes down to water. One cup of water conveniently takes up 8 fluid ounces of space and weighs about 8 ounces. But this is an exception, not the rule. Most ingredients don't follow this neat 1-to-1 ratio.
- For example: A cup of all-purpose flour fills an 8-fluid-ounce measuring cup, but it only weighs around 4.5 ounces.
- The bottom line: This is exactly why a kitchen scale is your best friend for baking. A gram is always a gram, but a cup of flour can vary wildly depending on how you scoop it.
How Do You Accurately Measure Sticky Ingredients?
We’ve all been there. You're trying to measure honey, molasses, or peanut butter, and half of it stubbornly stays behind in the measuring cup. It's frustrating and can throw your recipe completely out of whack. Luckily, there's a super simple trick for this.
Just give your measuring cup or spoon a light coating of cooking spray or a neutral-flavored oil before you add the sticky stuff. This creates a slick, non-stick surface, and the ingredient will slide right out, clean as a whistle. This tiny bit of prep ensures every last bit makes it into your bowl.
This oil trick is a real game-changer for recipes where the sugar content is critical, like when you're making caramel or certain types of frosting. It prevents you from accidentally leaving a whole tablespoon of sweetness stuck to the cup.
Can I Use a Dry Measuring Cup for Liquids?
You can, but you probably shouldn't if accuracy is what you're after. Dry and liquid measuring cups are designed differently for a reason, and using the wrong one can lead to surprisingly inaccurate results.
Dry measuring cups are designed to be filled right to the top and then leveled off with a knife or other straight edge. If you try that with water or milk, you're just asking for a spill. To avoid a mess, most people will naturally underfill it, which means you're not getting an accurate measurement.
Liquid measuring cups, on the other hand, have a pour spout and extra room above the final measurement line. This design lets you fill the cup to the correct line and move it without sloshing it all over the counter. For the best results, always place the cup on a flat surface and bend down to read the measurement at eye level.
Ready to make your cooking life easier? Recipe One is an AI-powered recipe keeper that saves any recipe from social media, images, or text into your personal library with a single click. It also includes free tools like our Cups to Grams converter and Oven Temperature guide to simplify all your cooking measurement conversions. Organize your culinary world and never lose a great recipe again. Explore how it works at https://www.recipeone.app/.

