When a recipe tells you to "simmer," it's asking you to cook food gently in liquid that’s just shy of its boiling point. You’re looking for tiny, consistent bubbles breaking the surface and a few gentle wisps of steam. This is the sweet spot of controlled heat, perfect for developing deep, rich flavors over time. Think of it as the essential middle ground between a gentle poach and a roaring boil.
So, What Does Simmer Really Mean?
Think of simmering as the marathon runner of cooking techniques. While a boil is a fast, aggressive sprint that blasts food with heat, simmering is all about slow and steady progress. This gentle heat is what coaxes out incredible flavor, tenderizes tough cuts of meat, and allows all your ingredients to meld together perfectly.
It’s this controlled environment that’s key for dishes where you want to build complexity. Unlike the high, direct heat of other methods, like you'd find in our guide on what it means to https://www.recipeone.app/blog/what-does-saute-mean-in-cooking, simmering works its magic quietly over a longer period.
Temperature and Visual Cues
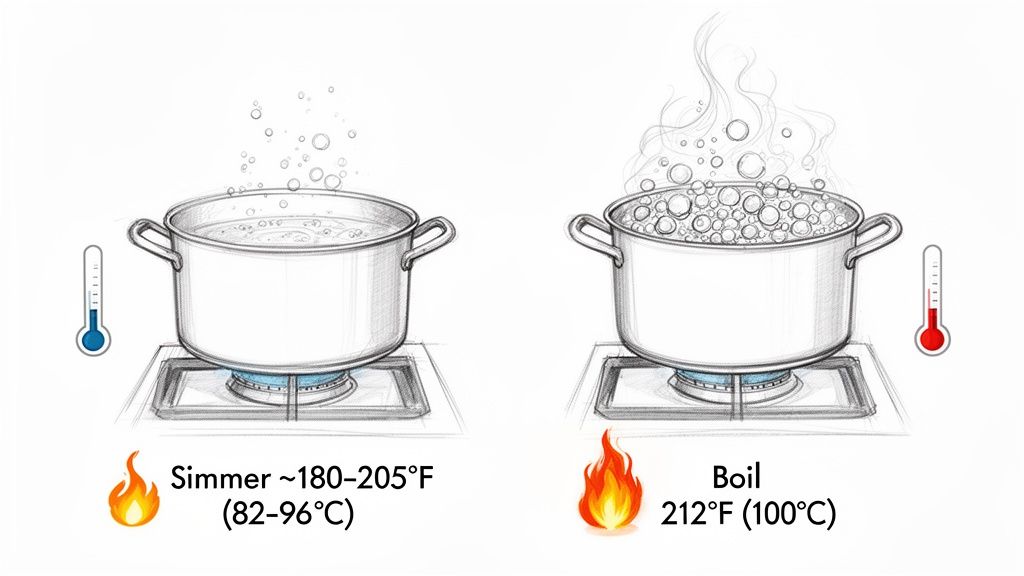
The specific temperature window is what separates a simmer from other ways of cooking with water. A true simmer happens between 180–205°F (82–96°C). At this temperature, you'll see those characteristic small, infrequent bubbles. This is noticeably hotter than poaching but still cooler than a full boil, which kicks in at 212°F (100°C) at sea level.
For a practical example, think about how crucial achieving the perfect simmer for delicate tasks like poaching eggs is. That gentle, barely-there bubbling is exactly what you’re aiming for to get tender, perfectly cooked results.
Expert Tip: The secret to a great simmer isn't just turning down the heat; it's about finding that perfect balance where gentle bubbles consistently break the surface without turning into a chaotic boil. This is where patience truly pays off in the kitchen.
Sometimes the best way to understand is to see it for yourself. To help you spot the difference in your own pot, I've put together a quick visual guide.
Cooking with Water: A Visual Guide
This table is a handy reference to help you visually identify what's happening in your pot, from a delicate poach to a rolling boil. Just match the bubble activity you see to the cooking method.
Cooking Method
Temperature Range (°F / °C)
What You'll See in the Pot
Poaching
160–180°F / 71–82°C
Very little bubble activity. You might see a few tiny bubbles on the bottom of the pot and gentle liquid movement.
Simmering
180–205°F / 82–96°C
Small, consistent bubbles gently breaking the surface of the liquid, along with visible wisps of steam.
Boiling
212°F / 100°C
Large, vigorous bubbles breaking the surface constantly and aggressively, with lots of steam.
Keep this guide in mind next time you're at the stove. Once you can recognize these stages by sight, you'll have much more control over the final outcome of your dish.
The Delicious Science of a Gentle Simmer
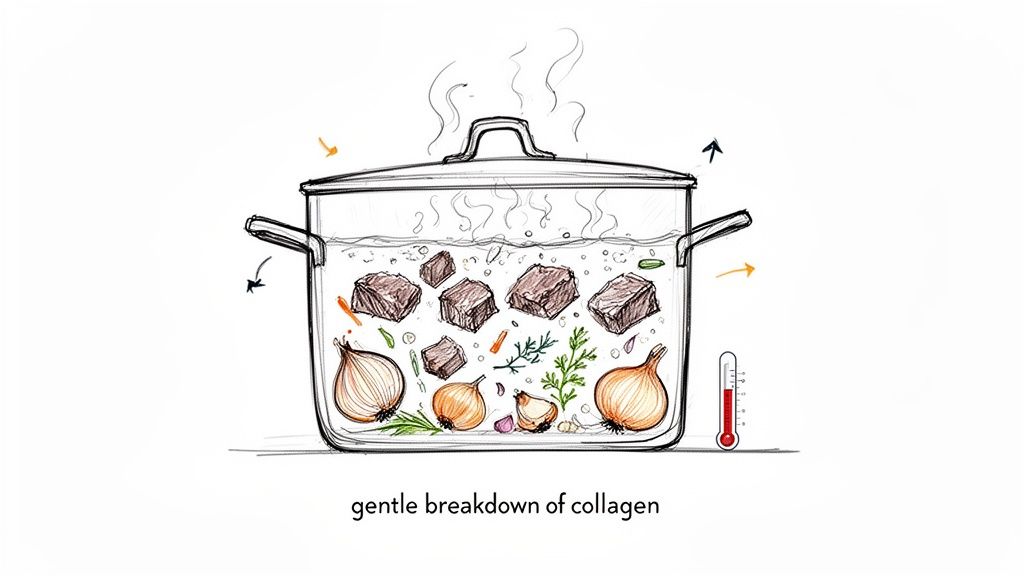
Have you ever wondered what makes a beef stew so incredibly tender after hours on the stove? It’s not just about cooking it for a long time—it’s about cooking it at the right temperature. The real secret is the gentle, steady science of a good simmer.
This low, controlled heat is the key to transforming tough ingredients into something spectacular. It’s what coaxes flavor and tenderness out of food, something a more aggressive heat just can't do.
Turning Toughness into Tenderness
Let's take a tough cut of meat like beef chuck. It’s packed with connective tissue called collagen, which is what makes it so chewy when cooked too quickly. Simmering works like a slow-motion magic trick on that collagen.
Over a long period, the low and slow heat gradually breaks down that tough collagen, melting it into rich, silky gelatin. You simply can't rush this. If you were to use a rolling boil, the meat's muscle fibers would contract and toughen up, leaving you with a rubbery, disappointing result.
This gentle transformation is how you get that perfect, fall-apart texture in your favorite slow-cooked meals. It’s a technique where patience pays off in a big way.
Building Deep, Complex Flavors
Simmering isn't just for texture; it’s a masterclass in flavor building. The consistent, gentle heat allows aromatics like onions, garlic, and herbs to slowly release their flavors into the surrounding liquid. They’re not being cooked aggressively; they’re infusing the entire dish. Understanding heat control, like knowing the details in a cooking oil smoke point chart, is part of mastering these techniques.
This is exactly why stews and sauces taste even better the next day. The ingredients have had time to mingle and meld, creating a deep, harmonious flavor that a rapid boil would have boiled away.
So, when you choose to simmer, you’re using a technique with a dual purpose. You're creating melt-in-your-mouth tenderness while simultaneously building layers of deep, unforgettable flavor.
How to Achieve the Perfect Simmer Every Time
Mastering the art of the simmer is one of those fundamental skills that really levels up your cooking, unlocking deeper flavors and perfect textures. And honestly, it's easier than it sounds.
The whole process is a simple two-step dance with your stove's heat. First, bring your liquid to a full boil. This gets everything up to temperature quickly. As soon as it's boiling, immediately turn the heat way down to low until you see just a few lazy bubbles breaking the surface.
Once you’ve dialed back the heat, the real finesse comes in. You're looking for that sweet spot on your stove's dial where the liquid holds steady. Every stove is a little different, so it might take a couple of tries to find your go-to setting.
Tips for Different Stovetops
Getting a perfect simmer often depends on the kind of stove you're working with. Gas stoves are great because you get instant, visual feedback—a tiny turn of the knob immediately changes the flame.
Electric coil or smooth ceramic cooktops are a bit different. They hold onto heat for a while, so you’ll need to anticipate and lower the temperature a bit before it looks perfect, giving the surface a moment to cool down.
Induction cooktops offer incredible precision, but you'll still have to learn which numerical setting corresponds to that gentle, consistent simmer.
Key Takeaway: No matter what kind of stove you have, don't just set it and forget it. Hang around for a minute to watch how the liquid responds. Finding that reliable "simmer setting" will make all your future recipes a breeze.
The Right Tools for a Steady Simmer
The pot you choose makes a huge difference in holding a stable temperature. A heavy-bottomed pot, like a Dutch oven or a good-quality saucepan, is your absolute best friend here. These pots spread the heat out evenly and hold it, preventing scorching and hot spots.
If you use a thin, cheap pot, you'll notice the temperature jumps around a lot. Your gentle simmer can quickly die out or erupt back into a full boil. The right pot acts as a buffer between your food and the burner's direct heat.
Don't forget to use your lid strategically:
- Lid Off: Perfect when you want to thicken a sauce. Leaving the lid off lets steam escape, reducing the liquid.
- Lid On: Traps heat and moisture inside. This is ideal for making tough cuts of meat fall-apart tender or for cooking grains without them drying out.
- Lid Ajar: The happy medium. This keeps most of the heat in while still allowing for some slow reduction.
Paying attention to these little details will make your simmering far more consistent and predictable. For more kitchen basics, don't miss our guide to cooking measurement conversions.
Why Simmering Unlocks Deeper Flavor and Better Nutrition
Following a recipe instruction to "simmer" isn't just a random step—it’s a conscious choice to invest in the flavor and nutritional quality of your food. This gentle, patient cooking technique is your secret weapon for developing deep, complex tastes that an aggressive boil would simply obliterate.
Think about making a rich stock or broth. Simmering is what coaxes all those wonderful, savory compounds out of the bones, meat, and vegetables. A hard, rolling boil, on the other hand, can turn things bitter and emulsify the fats, leaving you with a cloudy, greasy mess instead of a clear, flavorful base.
The Gentle Touch for Healthier Meals
Beyond the incredible taste, simmering has some real nutritional upsides. The lower, gentler heat helps preserve delicate, heat-sensitive vitamins that often get destroyed by more intense cooking methods. It's a quieter, more respectful way to cook.
Cooking science tells us that the sweet spot for simmering, right around 190–205 °F (88–96 °C), is perfect for pulling out flavor while protecting nutrients. Aggressive boiling doesn't just overheat your food; the violent churning action also contributes to the loss of water-soluble vitamins.
This simple visual breaks down exactly how to get there.
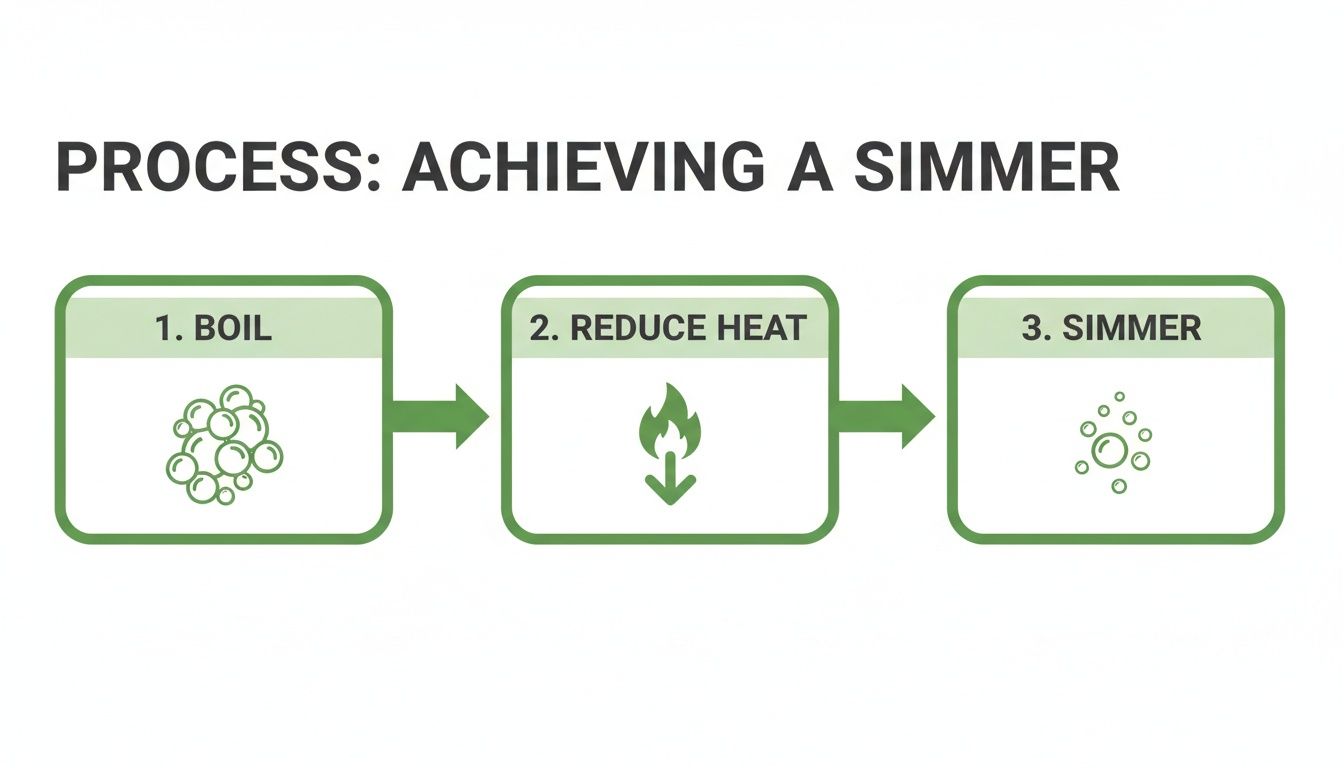
As you can see, the trick isn't to start low and slow. You bring the liquid to a boil first, then dial back the heat to settle it into that perfect, gentle simmer.
By applying heat gently, you ensure that your meal isn't just more delicious—it's also packed with more of the good stuff you started with. How you cook is truly as important as what you cook.
This patient approach is a game-changer for dishes where deep flavor is the ultimate goal. For sauces that need to cook for a long time to build that incredible richness—like in this ultimate slow-cooked chili guide—simmering is absolutely essential.
Simmering is also fantastic for slowly reducing liquids to concentrate their flavor. If you're curious about other ways to build rich, concentrated sauces, you might find some useful tips in our guide on how to thicken sauce in a Crock-Pot.
Common Simmering Hiccups and How to Fix Them

We’ve all been there. You turn your back for just a second, and that gentle simmer has exploded into a raging boil. Don't sweat it—these little slip-ups happen to everyone, and thankfully, they’re almost always easy to fix.
One of the classic mistakes is letting the simmer get too aggressive. This usually just means the burner is cranked up a bit too high, which can make sauces reduce too fast or turn tender cuts of meat tough.
On the flip side, you have the "disappearing simmer," where your lovely bubbles just fizzle out and die. This often happens when the heat is too low or when you've added cold ingredients that shock the liquid's temperature.
Quick Fixes for Common Simmering Problems
Instead of panicking when your pot starts misbehaving, just think of it as a quick course correction. Most simmering issues boil down to managing your heat, a fundamental skill for any home cook. If you're just starting out, building these core skills is everything, and our guide on how to cook for beginners is a great place to start.
Your Simmer Boils Over:
- Don’t just turn down the dial—immediately slide the pot halfway off the burner. This cuts the direct heat instantly.
- Once things calm down, lower the heat setting, wait a beat, and then move the pot back over the heat.
Your Sauce is Reducing Too Fast:
- Drop the heat and add a small splash of cool broth, water, or wine. This will slow things right down.
- Try partially covering the pot with a lid. This traps just enough steam to keep things from reducing too quickly.
Your Simmer Fizzles Out:
- Nudge the heat up just a bit until you see those gentle bubbles reappear, then immediately lower it back down to hold it steady.
- Remember that heavy-bottomed pots are your best friend here. Thin cookware loses heat much faster and can cause your simmer to stall.
Remember: A simmer is a delicate balance. It’s not about setting the heat and walking away. The real skill is in observing and making those tiny adjustments until it’s perfectly stable and consistent.
Your Simmering Questions Answered
Even with the basics down, a few questions always seem to pop up right when you're in the middle of cooking. Let's tackle some of the most common hangups so you can feel completely confident at the stove.
Think of this as the "what-if" section. These are the little details that can make a big difference, helping you nail that recipe every single time.
Should I Simmer with the Lid On or Off?
This is the big one, and the answer comes down to one simple question: do you want to reduce the liquid or keep it? It’s all about controlling steam.
Leaving the lid off is your go-to move for thickening sauces and concentrating flavors. As the steam escapes, the liquid reduces, and everything gets richer and more intense. This is perfect for a bolognese that needs to thicken up or a pan sauce you're finishing for a steak.
On the other hand, keeping the lid on traps all that moisture and heat inside. You’ll want to do this for dishes where you need to soften tough ingredients without losing all your liquid. Think of a hearty beef stew where the goal is tender meat, or when you're cooking rice and need that trapped steam to cook the grains perfectly.
A great little trick is to set the lid slightly ajar. This lets a little steam escape for a very slow, gentle reduction while still keeping most of the heat in. It's a nice middle ground.
How Do I Know How Long to Simmer Something?
If only there was a magic number! The truth is, simmering time completely depends on the recipe and your ingredients. A simple tomato sauce might only need 20-30 minutes for the flavors to come together, but a tough cut of beef in a stew could easily need 3 hours or more to get that fall-apart texture.
Your best bet is to follow the recipe's time as a starting point, but always trust your own judgment.
- Is the meat fork-tender?
- Have the flavors deepened and melded together?
- Is the sauce as thick as you want it?
Let the food tell you when it’s done. The timer is just a guide; the taste and texture are what really count.
What Is the Difference Between a Slow and Rapid Simmer?
Think of simmering as having different speeds. A slow simmer is the lowest gear. You'll see just a few tiny bubbles gently breaking the surface every second or two. This super-gentle heat is what you need for delicate things like custards or clear stocks, where you want to avoid scorching or making things cloudy.
A rapid simmer, or a vigorous simmer, is much more energetic and sits just below a full boil. You’ll see constant, lively bubbling all over the surface. You'd use this when you want to reduce a sauce fairly quickly but don't want the chaos of a rolling boil that could break apart tender ingredients.
Are you tired of losing great recipes you find online? Recipe One is an AI-powered tool that automatically saves and organizes recipes from social media, videos, or any text into your personal digital library. Stop the copy-paste struggle and keep your cooking inspiration perfectly organized with a single click. Discover how Recipe One can simplify your kitchen life.

