"Seasoning" is what gives cast iron its magic. It’s a simple process of baking a super-thin layer of oil onto the pan, which creates a natural, nonstick coating. This process, called polymerization, is what protects your skillet from rust and builds that slick, black surface that only gets better the more you cook with it.
Why Bother Seasoning Your Cast Iron?
If you're asking how to season a cast iron skillet, you're already on the right track. This isn't about adding salt and pepper; it's about turning a basic iron pan into a kitchen powerhouse. When you heat oil on the skillet, the fats actually bond with the metal on a molecular level, creating a hard, plastic-like layer.
This is the secret behind cast iron's legendary reputation. A perfectly seasoned pan lets you slide an egg right onto your plate or get that beautiful, crisp crust on a steak. Skip this step, and the porous iron is left wide open to moisture, which leads straight to its number one enemy: rust.
Building Your Skillet’s Ultimate Cooking Surface
Think of that first layer of seasoning as the foundation for your skillet's future. Every time you cook with a little oil or run it through a full seasoning cycle, you're adding another micro-layer to that protective shield. Over time, these layers fuse together into that beautiful dark, semi-glossy finish that's both tough as nails and naturally nonstick.
What do you get for your efforts?
- A Truly Natural Nonstick Surface: You can cook with less oil and forget about scraping, all without the synthetic chemicals found in typical nonstick pans.
- Complete Rust Prevention: The seasoning creates a barrier that seals the iron off from moisture and air. No more rust spots.
- A Skillet That Lasts Forever: A solid seasoning protects the pan from scratches and daily wear, making it a true heirloom piece you can pass down.
A great seasoning isn't just sitting on top of the pan; it's chemically bonded to the iron itself. That's why it's so much more resilient than the flimsy coatings on modern nonstick cookware that scratch and flake off.
This whole practice is steeped in history. Cast iron has been around since the 5th century BCE in China, eventually making its way to Europe. For centuries, getting a usable cooking surface meant a lot of work from the owner. It wasn't until the early 2000s that manufacturers started selling pre-seasoned skillets. If you're a history buff, you can find more details on the history of cast iron cookware on WebstaurantStore.com.
Choosing the Best Oil for Seasoning Your Skillet

The secret to that beautiful, slick cast iron surface everyone dreams of? It all comes down to the oil you use. This choice is the foundation for the nonstick seasoning you're about to build.
When it comes to seasoning, the single most important thing to look for is the oil's smoke point. That's the temperature where it stops shimmering and starts to smoke. To get that tough, polymerized layer, you have to heat the oil past this point.
This process, called polymerization, breaks down the fats and bonds them to the skillet's surface. It’s a chemical reaction that creates a hard, protective coating. If you use an oil with a low smoke point (like extra virgin olive oil), you’ll end up with a sticky, weak mess instead of a durable finish.
Comparison of Common Seasoning Oils
Everyone has their favorite oil, and honestly, there's no single "best" choice. It really depends on your budget, what you have on hand, and the kind of finish you're after. I've tried just about all of them over the years.
To get a better sense of how different fats behave under heat, this cooking oil smoke point chart is a fantastic resource.
Here’s a look at some of the most popular options, comparing what I've found works well and what you can expect from each.
| Oil Type | Smoke Point (°F/°C) | Pros | Cons |
|---|---|---|---|
| Grapeseed Oil | 420°F / 216°C | Inexpensive, neutral flavor, reliable results | Can be harder to find in some stores |
| Canola Oil | 400°F / 204°C | Very affordable, widely available, easy to work with | Some people dislike that it's highly processed |
| Avocado Oil | 520°F / 271°C | Extremely high smoke point, creates a very tough finish | Significantly more expensive |
| Flaxseed Oil | 225°F / 107°C | Produces a hard, glossy, "show-quality" finish | Expensive, prone to flaking if not applied perfectly |
So, which one should you actually use?
-
Grapeseed or Canola Oil: These are my go-to recommendations, especially if you're just starting out. They’re cheap, have high smoke points (around 400-450°F), and polymerize beautifully. You’ll get a durable, slick surface without any fuss.
-
Avocado Oil: If you don't mind spending a bit more, this is a powerhouse. With a smoke point over 500°F, it builds an incredibly tough seasoning that holds up to serious heat.
-
Flaxseed Oil: You'll hear cast iron purists swear by this one. It creates a stunningly hard, almost glass-like finish. The downside? That hardness makes it brittle. If you apply it even a little too thick, it can flake off. It’s also the priciest of the bunch.
The real key isn't the type of oil but how you apply it. Consistency beats everything. A cheap oil applied correctly in micro-thin layers will always outperform an expensive one slathered on too thick.
Your Guide to a Flawless Cast Iron Seasoning
This is where the magic really happens. Whether you're working with a brand-new skillet straight from the box or giving new life to an old flea-market find, the process of building that coveted nonstick surface is pretty much the same. Think of it as creating the perfect foundation for layers of baked-on oil to bond with the iron.
First things first, you need a perfectly clean slate. Give your skillet a good wash with warm water and a little bit of mild dish soap. This is especially important for new pans to get rid of any factory residue. If you're dealing with an older, rusty pan, a firm scrub with steel wool will get you back to the bare metal.
Now for the most critical part of the prep work: make sure the skillet is bone-dry.
From Clean Pan to Seasoned Surface
After washing, pop the pan on a stovetop burner over low heat for a few minutes. This little trick is my secret weapon for evaporating every last drop of moisture. It also gently opens up the pores of the iron, making it ready to absorb the oil. Once it's warm and completely dry, it's time for the main event.
This infographic lays out the essentials for getting your pan ready.
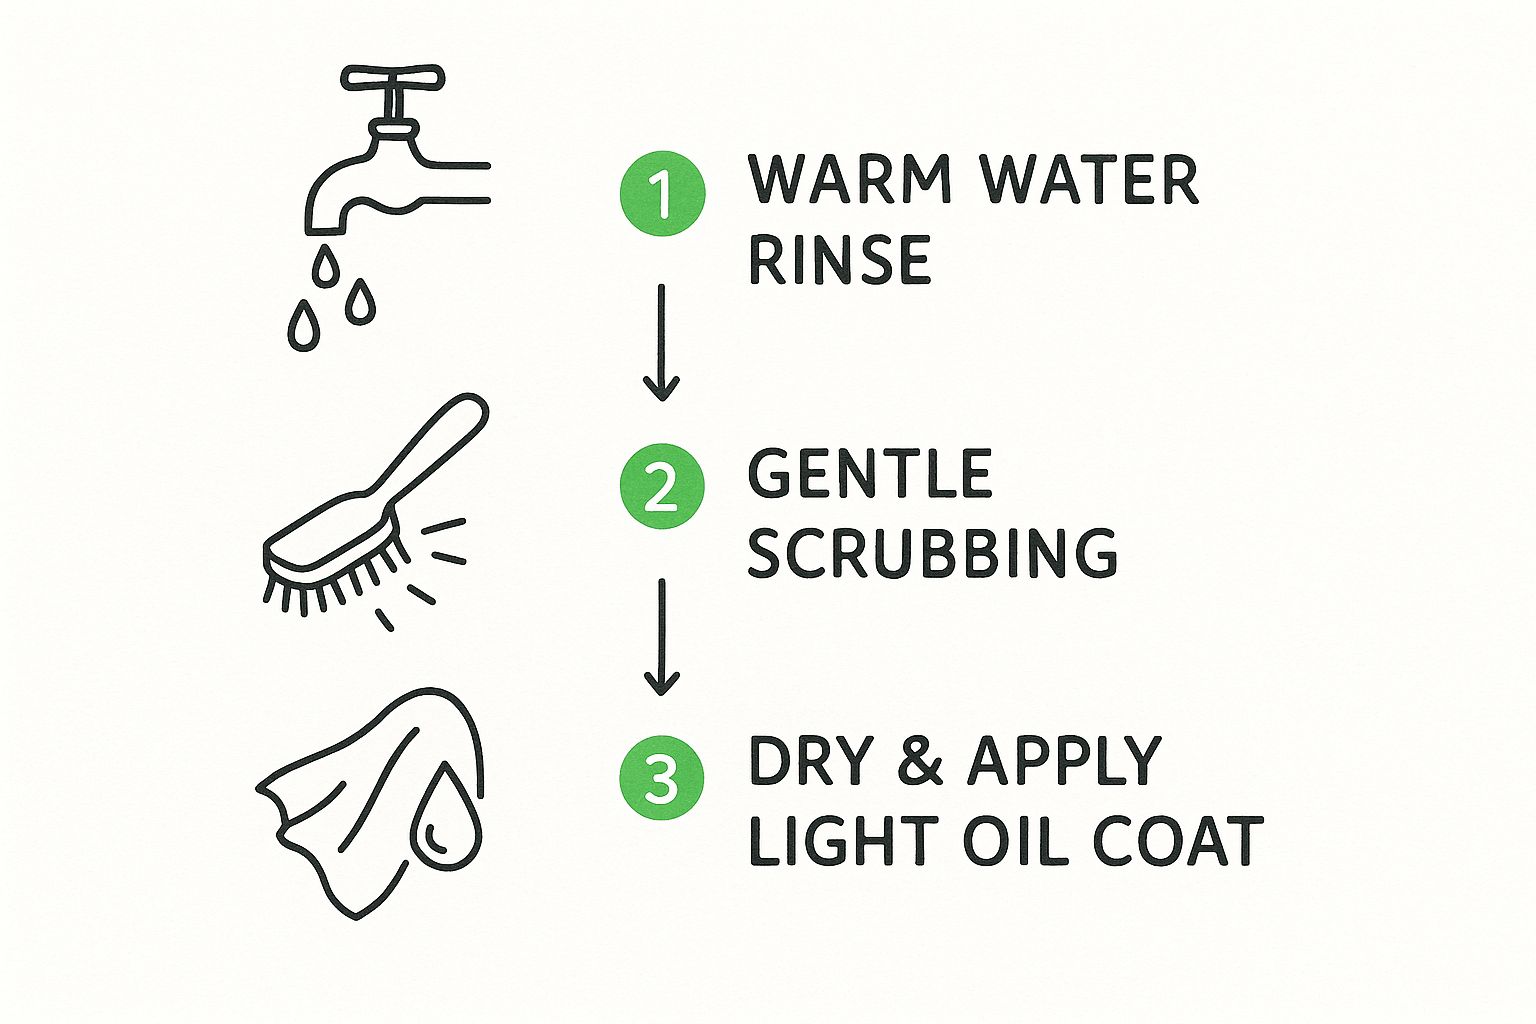
It all comes down to a simple rhythm: warm it, scrub it, and dry it completely before a single drop of oil touches the surface.
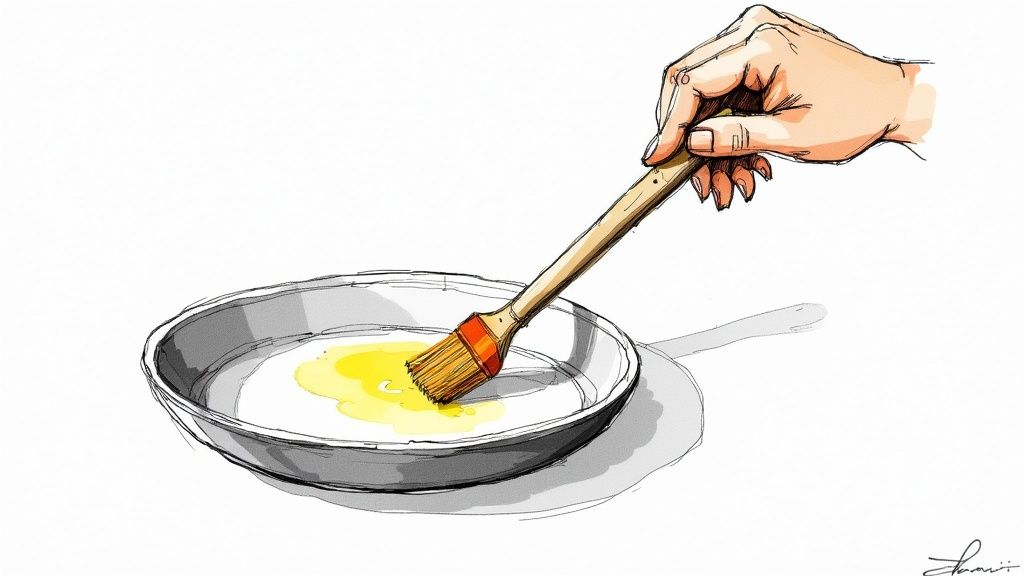
Alright, grab your seasoning oil and a lint-free cloth or a sturdy paper towel. Pour about a teaspoon of oil into the pan and start wiping it over every single inch—inside, outside, the bottom, and even the handle.
Then, here’s the key: take a clean, dry cloth and wipe off all the oil. Seriously. It should look like you've removed all of it, but what's left is an incredibly thin, invisible layer. This is exactly what you’re aiming for. Too much oil is the number one reason people end up with a sticky, splotchy mess.
The goal is to make the skillet look dry and dull, not slick and oily. It feels wrong, but this counterintuitive step is what prevents the oil from pooling and turning into a tacky disaster in the oven.
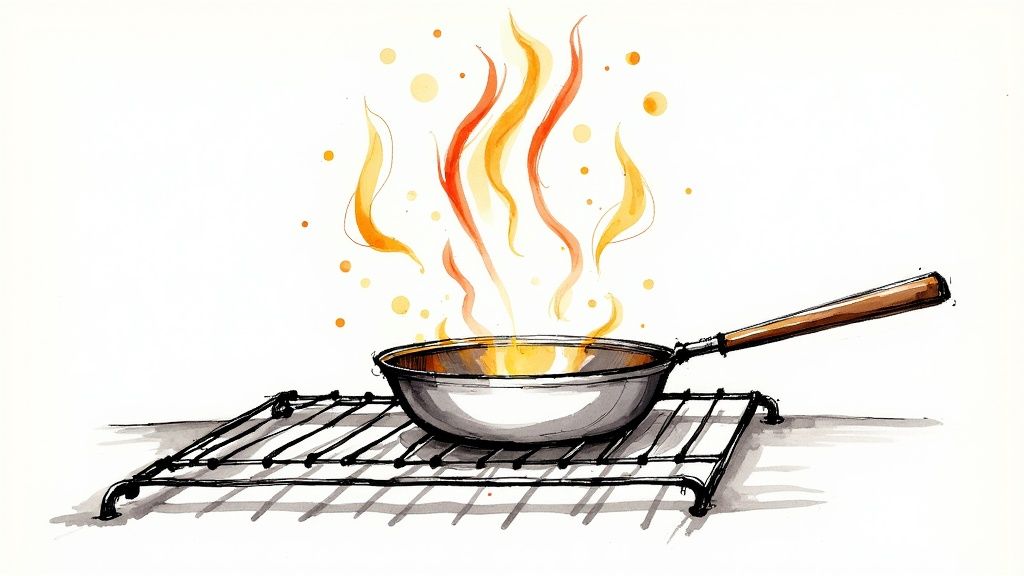
Next, get your oven preheating to 450-500°F (about 230-260°C). Place the skillet upside down on the center rack. Why upside down? It’s a simple way to let any tiny bits of excess oil drip away instead of pooling on your cooking surface. If you need a quick reference for temperatures, our oven temperature conversion table is a great resource.
Let the skillet bake for one full hour. When the timer goes off, just turn off the oven and leave the pan inside to cool down completely. This slow, gradual cooling is what helps the seasoning cure properly and become incredibly durable.
For a truly bulletproof, nonstick surface, you'll want to repeat this whole process—oiling, wiping, baking, and cooling—at least three to five times. Each cycle adds another tough, polymerized layer, building up that beautiful, glass-like finish that will last for years to come.
Keeping Your Seasoning Strong with Daily Care
A perfect seasoning layer isn’t a one-and-done deal. It’s something you build and strengthen every single time you cook. Your daily habits are what truly transform a good skillet into an indispensable, heirloom-quality kitchen tool.
Believe it or not, the best way to maintain that nonstick surface is simply to cook with it.
Foods with a bit of fat—think bacon, seared steaks, or even vegetables sautéed in oil—naturally bolster the seasoning. Each meal adds another micro-layer of polymerized fat, making the skillet slicker and more durable. It's a living finish that gets better the more you use it.
The Post-Cooking Ritual
Your after-dinner routine doesn't need to be a huge chore. The main goal is to get the pan clean without undoing all the hard work you've put into building that beautiful seasoning.
Here’s a simple and effective method I swear by:
- Scrape and Rinse: While the pan is still warm (but not screaming hot!), use a flat-edged wooden spatula or a dedicated pan scraper to lift off any stuck-on bits of food. A quick rinse under hot water with a brush or non-abrasive sponge usually takes care of the rest.
- No Soaking, Ever: This is the cardinal rule. Never, ever let your cast iron soak in the sink. Leaving it submerged in water is the fastest way to invite rust and strip away your hard-earned seasoning.
Honestly, this gentle approach is all you need most of the time. The techniques for cast iron are totally different from other cookware; for example, the best way to clean baking sheets often involves soaking, which you'd never do here.
The old wive's tale about never using soap is a bit outdated. A tiny drop of modern, mild dish soap is fine for a well-seasoned pan. The key is to wash it quickly and rinse it thoroughly—don't let it sit.
Once the pan is clean, there are two final steps that are absolutely non-negotiable for keeping it in prime condition.
First, put the skillet back on a burner over low heat for a few minutes. You want to make sure it's 100% bone-dry, as this simple step zaps any lingering moisture that could lead to rust.
Finally, while it’s still warm, add a half-teaspoon of your go-to cooking oil and wipe a very thin layer over the entire cooking surface with a paper towel. This quick "maintenance coat" protects the surface and keeps it ready for your next meal. It’s this daily care that takes the factory pre-seasoning, a process Lodge perfected back in 2002, and makes it truly your own.
Fixing Common Cast Iron Seasoning Problems
Even when you do everything right, seasoning can be a bit finicky. You might end up with a sticky surface, notice little black flakes in your food, or see the dreaded orange tint of rust. It can feel like a setback, but trust me, almost every cast iron issue is completely fixable.
Don't think of these as failures. Instead, they're just part of the learning process. Once you understand what causes these minor bumps in the road, you'll know exactly how to prevent them and keep your skillet in prime condition. Most of the time, the solution is simple and gets you back to cooking in no time.
Tackling a Tacky or Sticky Surface
Ever seasoned your pan and found it feels gummy or sticky? That’s a classic sign of using too much oil. It’s a really common mistake. The goal is to create an almost invisible, paper-thin layer. When the oil is applied too heavily, it can't fully polymerize and just pools on the surface, leaving a soft, tacky mess.
Thankfully, the fix is easy. Just pop the sticky pan back into the oven, upside down, and bake it at 450-500°F for another hour. That extra blast of heat will help the excess oil finish polymerizing and harden up. Usually, one more bake cycle is all it takes.
Dealing with Flaky Seasoning
If you spot little black bits chipping off your pan, it’s not the iron itself—it’s the seasoning. This usually happens for two reasons: a previous layer of oil was put on too thick, or you cooked something acidic that started to eat away at a weaker spot. It’s not harmful, but it is a clear signal that your pan needs a little TLC.
To sort it out, grab a chainmail scrubber or some coarse salt and give the pan a good scrub to knock off all those loose flakes. After that, just wash and dry it thoroughly, then wipe on a fresh, super-thin coat of oil. A round or two of oven seasoning should bond everything back together and build a stronger surface.
Don’t panic when you see rust. Cast iron is incredibly resilient. A little rust is just an opportunity to strip the pan down and build a fresh, stronger seasoning from scratch, making it even better than before.
Erasing Rust and Starting Fresh
Rust is the main villain in the cast iron world, but it's an easy one to defeat. It almost always shows up when a pan is left exposed to moisture for too long—the classic mistake is leaving it to soak in the sink.
Getting rid of it is straightforward. Use some steel wool, a little water, and a drop of soap to scour away every bit of orange until you’re back to the bare, gray metal. Once it's clean, you’re basically starting the seasoning process from scratch. Dry it completely on the stovetop to evaporate every last drop of moisture, and then you're ready to apply your first new layer of oil.
Got Questions About Seasoning Your Cast Iron?
Even when you follow the steps, a few questions always seem to come up. It's totally normal to worry about messing up your pan after putting in all that work. Let's tackle some of the most common myths and concerns so you can feel good about what you're doing.
Don't sweat the small stuff too much. The great thing about cast iron is how tough it is. Most "mistakes" are surprisingly easy to fix and are just part of the learning curve.
Is It Really Okay to Use Soap on My Skillet?
Yes, it is! This is probably the biggest myth in the cast iron world. That old "no soap" rule comes from a time when soap was made with lye, which would absolutely destroy your seasoning. Modern dish soaps are much gentler and are perfectly fine for a quick clean.
The real trick isn't avoiding soap, it's how you use it. Just remember these golden rules:
- Don't ever let it soak. Leaving your pan in a sink full of water is the fastest way to find rust.
- Keep it quick. Just a simple wash and rinse; don't let the soap hang out on the surface for a long time.
- Dry it immediately and thoroughly. Towel it off right away, then stick it on a warm burner for a minute or two. This gets rid of any lingering moisture you can't see.
How Often Should I Be Doing a Full Re-Seasoning in the Oven?
Honestly, almost never. If you're taking good care of your skillet day-to-day, that big oven seasoning process is overkill. That's really for bringing a rusty, neglected pan back from the dead.
What you should focus on is "maintenance seasoning." It’s as simple as wiping a paper-thin layer of oil onto the cooking surface after you wash and dry it. This takes less than a minute and is what really builds and repairs that nonstick layer over time. You only need to break out the full oven routine if your pan's performance has taken a nosedive or you’re seeing major rust or flaking.
Every time you cook with oil or fat, you're adding a micro-layer of seasoning. Frying up some bacon or searing a steak does more for your pan than you'd think.
Can I Cook Acidic Things Like Tomato Sauce?
Great question. The answer here is, "it depends on your seasoning." If your pan is brand new or the seasoning is still a little weak, you should probably hold off on simmering things like tomato sauce, wine, or lemon juice for a long time. The acid can break down those fragile new layers.
Once you’ve built up a hard, slick, dark-black surface, a little acid is no big deal. A really strong seasoning layer acts as a barrier, protecting the iron underneath. Just cook your meal, clean the pan as soon as you're done, and wipe on your usual thin coat of oil.
Help! My Seasoning Is Flaking Off. What Did I Do Wrong?
It’s definitely startling to see little black flakes in your food, but don't panic! It’s not your pan falling apart—it's just the seasoning. This usually happens for one of two reasons: either a layer of oil was put on way too thick, or there was some old food residue on the pan before it was seasoned.
The fix is pretty simple. Grab a chainmail scrubber or some coarse salt and a paper towel and gently scrub away all the loose, flaky stuff. Give the pan a good wash, dry it completely, and then do a round or two of the oven seasoning method. That will help build back a stronger, more even base layer.
Ready to keep all your recipes—from cast iron classics to new online finds—perfectly organized? Recipe One is an AI-powered recipe keeper that automatically saves and structures recipes from any source into your personal digital library. Click here to simplify your cooking with Recipe One!

