If you’ve ever followed a recipe perfectly, only to have it fail spectacularly, you're not alone. Think of a cake that comes out dry, bread that won’t rise, or cookies that melt into one giant, flat mess on the baking sheet. Chances are, the problem wasn't your oven—it was the measurements.
This is where understanding how to properly convert recipe measurements comes in. It's an essential skill that can take you from just following instructions to truly understanding the craft of cooking and baking.
Why Accurate Recipe Conversions Matter
Mastering conversions is what lets you confidently tackle recipes from other countries, make adjustments on the fly, and get consistent results every single time. It turns cooking from a guessing game into a reliable science.
The Problem with "Just a Cup"
Here's the core issue: the U.S. customary system (cups, tablespoons) measures by volume, while the metric system, which is standard in most of the world, measures by weight (grams) and volume (milliliters). This fundamental difference is where things often fall apart.
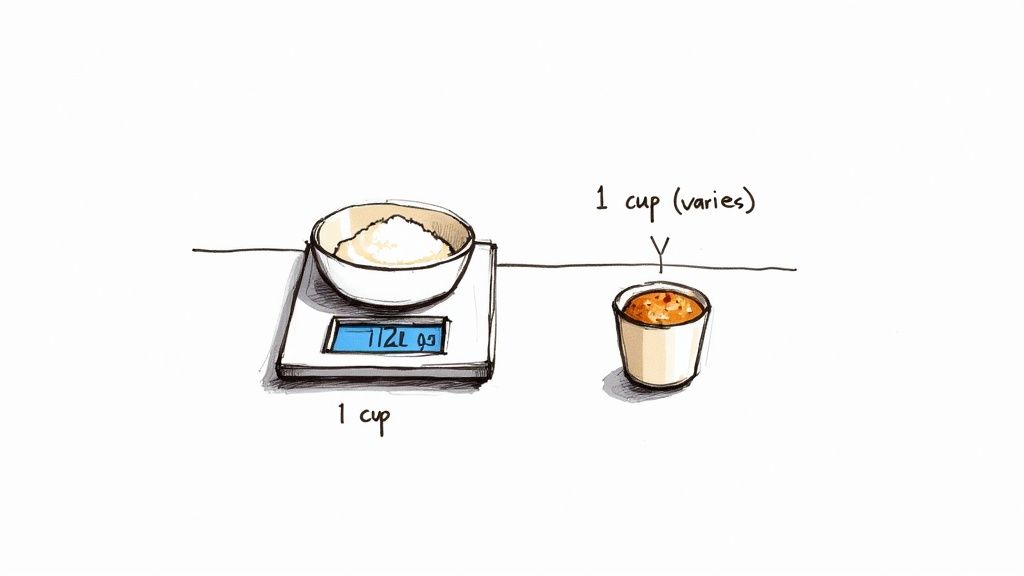
Take flour, for instance. A single cup of all-purpose flour can weigh anywhere from 110 to 150 grams, all depending on how you pack it into the cup. That 40-gram difference is huge—it’s enough to ruin the texture of a delicate cake, turning it from moist and tender to dense and heavy.
In baking, consistency is everything. An inaccurate conversion can completely alter the ratio of flour to fat to sugar, throwing off the entire structure and texture of your final product.
This is exactly why so many professional bakers and serious home cooks swear by their kitchen scales. When you weigh your ingredients, you eliminate all the guesswork. 120 grams of flour is always 120 grams of flour, no matter what.
From Vague Instructions to Scientific Precision
It’s interesting to think that cooking wasn't always so precise. Before the 19th century, recipes were notoriously vague, calling for "a knob of butter" or "a teacup of sugar." It was pioneers in domestic science who pushed for standardized, exact quantities, realizing that repeatable results demanded a more scientific method.
Learning how to properly write recipes with clear measurements is just as crucial as knowing how to read them. It’s a skill that helps you build a personal collection of foolproof, go-to dishes.
In the end, mastering recipe conversion isn't just about doing math. It’s about building your confidence in the kitchen, preventing wasted ingredients, and making sure your hard work pays off with delicious results.
Converting Volume Between Metric and Imperial
Ever find a fantastic recipe online, only to realize it’s written in milliliters when all you have are measuring cups? It’s a classic kitchen conundrum. This is probably the most common measurement hurdle you'll face, especially when you start exploring recipes from different parts of the world.
The core of the issue is the two systems. Most of the world uses the beautifully simple metric system, where everything is based on units of 10. This makes scaling a recipe up or down a breeze. The U.S., on the other hand, sticks with its customary system of teaspoons, tablespoons, and cups. They work, but the math isn't quite as neat.
Let's say a French pastry recipe calls for 250 ml of milk. If you do a quick conversion, you'll see that's just a tiny bit more than 1 U.S. cup (237 ml). For a hearty soup, that small difference probably won't matter. But in a delicate cake? That extra liquid could easily throw off the texture.
Getting the Basics Down: Imperial to Metric
You don't need to become a walking calculator, but getting a feel for the most common conversions will save you a ton of time and mid-recipe Googling. Think of these as the essential numbers to keep in your back pocket.
- 1 U.S. Teaspoon (tsp) is about 5 ml.
- 1 U.S. Tablespoon (tbsp) is about 15 ml (which is also 3 teaspoons).
- 1 U.S. Cup is roughly 237 ml.
- 1 U.S. Pint is simply 2 cups, or about 473 ml.
One thing I can't stress enough: these are all volume measurements. They measure how much space an ingredient takes up, not how much it weighs. This is a critical distinction, especially for dry ingredients like flour where packing can change everything. For a much deeper dive on that topic, our guide on converting cups to grams is a great resource.
The infographic below really drives home how getting your measurements right is tied to consistency and being able to cook recipes from anywhere.

Ultimately, getting comfortable with these conversions is all about making sure your dishes turn out great, no matter where the recipe came from.
To give you a handy reference, I've put together this quick-look table for the most frequent conversions you'll encounter.
Common Liquid and Dry Volume Conversions
Here's a simple chart for translating between U.S. Customary and Metric volume measurements. Keep this handy in your kitchen!
U.S. Customary Unit
Metric Equivalent (approx.)
Fluid Ounces (U.S.)
1/4 teaspoon
1.23 ml
0.04 fl oz
1/2 teaspoon
2.47 ml
0.08 fl oz
1 teaspoon
5 ml
0.17 fl oz
1 tablespoon
15 ml
0.5 fl oz
1/4 cup
59 ml
2 fl oz
1/3 cup
79 ml
2.67 fl oz
1/2 cup
118 ml
4 fl oz
1 cup
237 ml
8 fl oz
This table is a lifesaver when you're in the middle of a recipe and just need a number fast.
Why Are These Conversions So Tricky Anyway?
Honestly, the challenge is often cultural. The U.S. is one of the very few countries (along with Myanmar and Liberia) that hasn't officially adopted the metric system for everyday things. This has a direct impact on our kitchens, where cups and spoons still rule. It makes these conversion skills essential for any American cook wanting to try a recipe from abroad, or vice versa. You can read more about this great measurement divide on Food52.com.
And to make things just a little more confusing, not all "imperial" measurements are created equal. A UK pint, for example, is 20 fluid ounces. But a U.S. pint? It's only 16 fluid ounces. That’s a significant difference that could easily turn your perfect batter into a watery mess. My advice: always double-check the recipe's country of origin.
The Secret to Perfect Baking: Weighing Your Ingredients
If you're serious about getting consistent, bakery-quality results, it's time to get friendly with the single most important tool in any baker's kitchen: the digital scale. While knowing how to convert volume is handy, the real secret to flawless baking is to stop measuring by volume altogether and start measuring by weight. This is how the pros turn a guessing game into a precise science.
It all comes down to what you're actually measuring. Cups measure volume—the amount of space something takes up. A scale, on the other hand, measures mass—how much it actually weighs. These two things are not the same, and that's exactly where many recipes go off the rails.
Think about it this way: a pound of feathers and a pound of rocks weigh the same, but they take up completely different amounts of space. The same thing happens in your kitchen. A cup of light, airy cocoa powder simply doesn't weigh the same as a cup of dense, packed brown sugar.
Why Flour Is the Perfect Example
Let's talk about scooping a cup of flour. Did you fluff it up first? Did you dig the cup right into the bag and pack it down? Or did you carefully spoon it in and level it off with a knife? Each method will give you a different amount of flour, sometimes varying by 30-40 grams or more. That's easily enough to turn a tender cake into a dry, dense brick.
But when a recipe calls for 120 grams of flour, it’s always 120 grams. Period. There's no room for interpretation. This precision ensures your ingredient ratios are perfect every single time, leading to predictable and repeatable success in the kitchen.
Weighing your ingredients is the single biggest step you can take toward becoming a more confident and consistent baker. It eliminates the most common variable for error and guarantees your results will match the recipe's intention.
Bonus: This method is also cleaner and faster. Instead of dirtying a bunch of measuring cups and spoons, you can just place your mixing bowl on the scale, hit the "tare" (or zero) button, and add each ingredient one by one, zeroing out the scale after each addition.
Putting Weight Into Practice
Imagine you're tackling a sourdough bread recipe that calls for 500g of bread flour. If you tried to convert this to cups, you'd find a dozen different answers online. With a scale, you simply pour the flour into your bowl until the display reads 500g. It's completely foolproof.
This is a lifesaver for sticky ingredients like honey or tricky ones like butter. No more wrestling with a greasy measuring cup! Just add the correct weight and move on. Speaking of butter, if you're ever unsure about specific measurements, our guide on https://www.recipeone.app/blog/how-many-grams-is-two-sticks-of-butter can clear things up for you.
For those who really want to geek out on precision, especially when scaling recipes, using baker's percentages is key. In those cases, having a dedicated percentage calculator on hand can be incredibly helpful for making exact adjustments.
To help you get started, I've put together a chart with the weights of some common ingredients.
Common Ingredient Weight per U.S. Cup
This table provides the standard weight for one U.S. cup of various common baking and cooking ingredients. Remember, these are trusted averages, but they’re a fantastic starting point for converting your favorite recipes from volume to weight.
| Ingredient | Grams per U.S. Cup | Ounces per U.S. Cup |
|---|---|---|
| All-Purpose Flour | 120 g | 4.25 oz |
| Bread Flour | 127 g | 4.5 oz |
| Granulated Sugar | 200 g | 7 oz |
| Brown Sugar (packed) | 220 g | 7.75 oz |
| Powdered Sugar | 120 g | 4.25 oz |
| Unsweetened Cocoa Powder | 90 g | 3.2 oz |
| Rolled Oats | 85 g | 3 oz |
| Chocolate Chips | 170 g | 6 oz |
| Butter | 227 g | 8 oz |
| Water / Milk | 240 g | 8.4 oz |
Using a chart like this makes it easy to see just how much weights can vary. Once you get the hang of it, you'll wonder how you ever baked without a scale.
Getting Temperature and Pan Sizes Right
Great baking is about more than just getting the ingredients right. The equipment you use—specifically your oven and your pans—can make or break the final product. Even a perfectly measured cake batter can end up a burnt, gooey mess if you don't nail the temperature and pan size.
From Celsius to Fahrenheit (and Back Again)
One of the most common snags when trying a recipe from another country is the oven temperature. Recipes from the UK or Europe will often list temperatures in Celsius (°C) or Gas Mark, while most of us in the States think in Fahrenheit (°F).
Don't let that throw you off. A call for 180°C is simply the European standard for a moderate oven, which translates directly to 350°F. Getting this right is non-negotiable. For a quick reference, we've put together a complete oven temperature conversion table that covers Fahrenheit, Celsius, and Gas Mark.
Does Your Pan Measure Up?
What happens when a recipe calls for a classic 9x13 inch pan, but all you have are round cake pans? This is a super common problem, but a little quick math will save you from an overflowing oven or a sadly flat cake.
The secret is to match the pan's volume, not just its shape. Here’s a simple way to figure it out:
- Rectangular or Square Pans: Just multiply Length x Width x Height.
- Round Pans: The formula is πr²h (where π is roughly 3.14, r is the radius, and h is the height).
A standard 9x13 inch pan (that's 2 inches deep) holds about 14-15 cups of batter. Your job is to find a pan (or combination of pans) you already own that holds a similar amount. For instance, two 9-inch round pans are a fantastic substitute, holding just about the same volume—perfect for a layer cake.
Never just eyeball it when swapping pans. A quick volume calculation ensures the batter depth is correct. This is absolutely critical for even baking and getting the cooking time right.
Adjusting Your Baking Time
Once you’ve swapped the pan, you almost always have to tweak the baking time. This is more of an art than a science, but a few simple guidelines will get you started.
If your batter is spread thinner in the new pan, it's going to cook faster. Start checking for doneness about 25% earlier than the recipe says.
On the flip side, if the batter is deeper in a smaller pan, it will need more time. Check it at the recipe's suggested time, but be prepared to add another 15-25% to the clock.
Ultimately, trust your senses over the timer. Use visual cues and the classic toothpick test to know when it's truly done. Paying this much attention to the details is what separates a good baker from a great one.
Decoding Vintage and Unusual Measurements
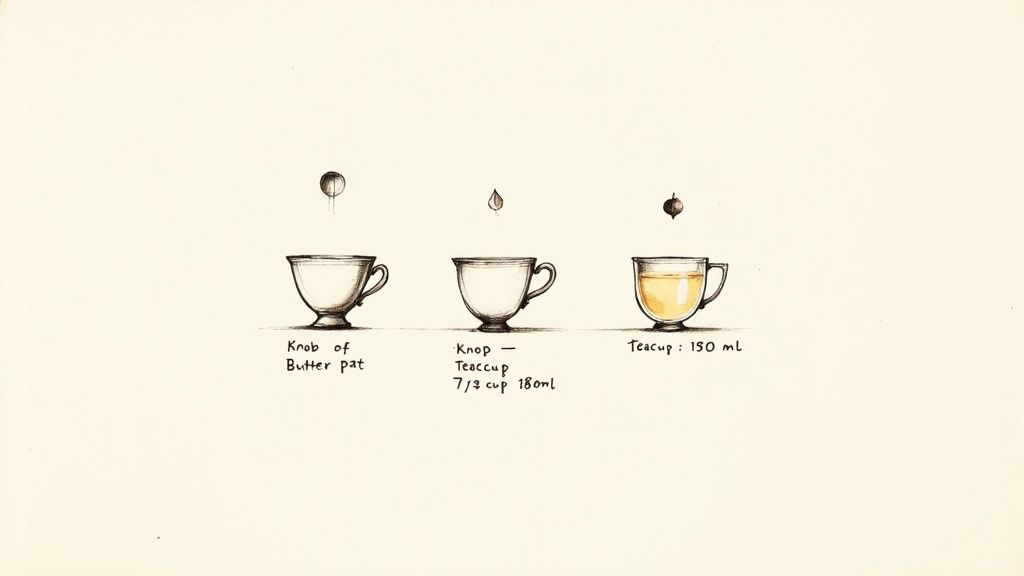
Ever found yourself staring at a treasured recipe from your grandmother's collection, completely stumped by an instruction like "add a knob of butter" or "a teacup of flour"? It can feel like trying to crack a secret code. But don't worry, these charming, old-fashioned terms are perfectly solvable once you know what to look for when you convert recipe measurements for a modern kitchen.
These recipes come from a time before standardized measuring cups and spoons were a staple in every home. Cooks simply relied on experience, intuition, and the familiar household items they had on hand. The trick is to understand that context and find a reliable modern equivalent.
Cracking the Code on Common Vintage Terms
Let’s break down some of the most common vague measurements you'll encounter and give them a solid starting point. Just remember, these are close approximations. You might need to adjust a little based on how the batter or dough looks and feels.
- A Knob of Butter: This usually means a small, irregular chunk. A good rule of thumb is to think of it as roughly 1 to 2 tablespoons.
- A Pinch or Dash: For potent dry ingredients like salt or spices, this is what you can literally hold between your thumb and forefinger. It works out to about 1/16 to 1/8 of a teaspoon.
- A Scant Cup: This just means the cup isn't quite full. To get it right, measure a full cup and then simply remove about 2 tablespoons.
- A Heaping Cup: The opposite of scant, this implies the ingredient is mounded over the top of the measuring cup. Start with a standard cup and add an extra 2 to 3 tablespoons.
Recipes from a century ago can be a real challenge. Ingredients were often described by the container they were in, like 'a wineglassful of juice,’ because that’s what the cook had. What's more, old imperial measuring cups were often 20% larger than the U.S. standard cups we use today, which can throw everything off. You can dive deeper into these fascinating historical measurement quirks at SilverHomestead.com.
Translating Old Kitchenware Sizes
The biggest trap I see people fall into with vintage recipes is assuming the kitchenware sizes are the same as today. They almost never are.
A "teacup" in a vintage recipe is not the same as a modern U.S. cup. Historically, a teacup held about 6 fluid ounces, which is only 3/4 of a modern 8-ounce U.S. cup.
That 25% difference is more than enough to turn a perfect cake into a dry, crumbly mess. When a recipe calls for a "teacup," start by measuring 3/4 cup (around 180 ml) and see how the consistency feels. The same logic applies to a "coffee cup," which often referred to a small, 4-ounce cup from an old dinner set.
Knowing these historical differences is the key to preserving the soul of an heirloom recipe while making sure it actually turns out right in your kitchen.
Common Questions About Recipe Conversions
Even with the best tools on hand, you're bound to run into a few head-scratchers when you start converting recipe measurements. That's perfectly normal! It’s all part of getting comfortable with this essential kitchen skill.
Think of this section as your personal FAQ for those little hurdles that can trip up even experienced cooks. Getting these details right can be the difference between a kitchen triumph and a frustrating flop.
What Is the Most Accurate Way to Measure Flour?
Hands down, the most accurate way to measure flour is by weight using a digital kitchen scale. There's a good reason every professional baker lives and dies by their scale. Depending on how you scoop it, a single cup of flour can weigh anywhere from 110g to 150g. That's a huge variable that can ruin cakes, cookies, and bread.
Don't have a scale? No problem. The next best approach is the "fluff, spoon, and level" method.
- First, use a fork to fluff up the flour right in the bag or container. This aerates it.
- Next, gently spoon that fluffed flour into your measuring cup until it’s overflowing a bit.
- Finally, take the flat back of a knife and level off the top with one clean sweep.
This technique keeps you from compacting the flour into the cup, giving you a much more consistent result than just scooping directly.
Can I Use a Standard Chart for All Ingredient Conversions?
Those handy conversion charts are great starting points, especially for simple ingredients like water or granulated sugar. But they are definitely not a one-size-fits-all solution. Different ingredients have wildly different densities, meaning their volume-to-weight relationship is unique.
A cup of dense, packed brown sugar, for example, weighs about 220 grams. A cup of light, airy cocoa powder? That comes in at only around 90 grams. Using the same generic conversion for both would be a recipe for disaster.
When you're not sure, it's always smarter to look up a conversion specific to that ingredient. A quick online search for "1 cup of oats in grams" will give you a much more reliable number. It’s also helpful to understand how these amounts affect your dish's nutrition, which you can do with a good recipe calorie calculator.
What Are the Key Measurement Differences in UK Recipes?
If you're in the US and trying a recipe from the UK, you'll need to watch out for a few key differences. British recipes almost always rely on metric weights (grams) and Celsius for temperatures. You might even see the occasional "Gas Mark" for oven settings.
The most common trap, though, is with liquid volume. A UK pint is 20 fluid ounces, which is significantly larger than a US pint at just 16 fluid ounces. Always double-check which system the recipe was written for to avoid a soupy, watery mess.

